The Scenic Way Home

Kevin and I met at 5pm on the 520 biketrail. I could see him arriving from a hundred feet away, spinning along with the fast cadence of a single speed mountain biker riding on pavement.

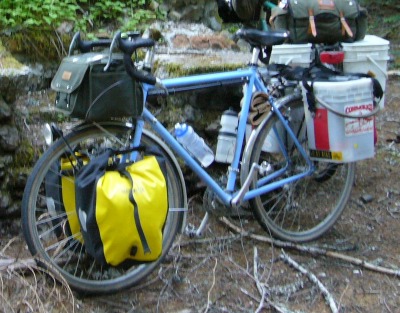
Our destination was the Tolt Pipeline Trail, about6 miles away down the 520 and Sammamish River Trails. The Tolt intersects the Sammamish River Trail at Redhook Brewery. We pushed our way through a strong headwind on our way to the brewery. There we picked up a 3rd cyclist, Bill, and set off. Suddenly I felt a little out of place on my Kogswell 650B touring bike while these two had singlespeed mountain bikes.

Many people have taken the Tolt Pipeline Trail east from Redhook, but I don’t know many who have taken it west. Kevin and Bill were interested in checking it out to add some miles to Kevin’s Thrilla suburban MTB route. I wanted to find something to break up the monotony of the Burke Gilman commute going home. We wound around behind Redhook and the ropes course and found the trai.

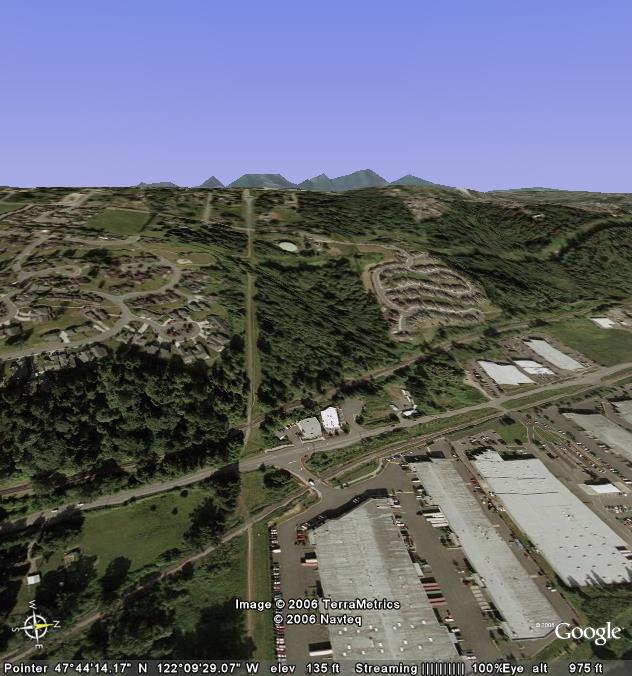
The Tolt Pipeline Trail is a trail that runs on top of the Tolt Pipeline right of way. Pipes don’t really care about hills and the trail doesn’t either. We knew that we had found the trail when the first view of it was a narrow and long clearing going straight up a hill.

The Tolt trail heading west is much like the Tolt trail heading east. There are often two sections to ride one, one is loose and chunky gravel and the other is compacted grass. I was glad to have my low 22×32 gear while churning up the hills.

At the top of the second or third hill we found some trails off to the side and explored them. We were hoping to find a singletrack detour for part of the trail, but that didn’t really pan out. We did find a hidden neighborhood playground and some overgrown trails through some woods that are about to be developed. This is where I remembered the limitations of wearing SPD sandals while riding offroad — blackberry thorns don’t feel good going into your big toe. I also remembered that the main disadvantage in riding a touring bike offroad is that the low bottom bracket doesn’t give you much clearance when going over logs.

We came to 405 fairly quickly and detoured around it. Kevin had very good notes and took the route around as if he ridden this area before. On the other side of the 405 we found some more of the same, mostly steep but not too steep climbs. The last one took us to the end of the trail. It ends at a large dropoff overlooking the Burke Gilman and Bothell below.

We took at right on the road at the top of the trail and then the next left onto 102nd and down through a newer neighborhood. Just behind some construction there was an old piece of singletrack that led us down a steep hill to Bythe Park and the Burke Gilman trail in Bothell. We explored the park for a little while hoping to find more singletrack, but came up empty handed. We had been riding for 2+ hours and had found the end of our ride.

After a quick dinner at the Bothell Ale House I headed back on the Burke Gilman Trail going to Seattle. I had just become dark enough to require a headlight and this was my first ride with a light in a long time. The trail turns into a different and much more peaceful place in the dark. There are few people and the main noise comes from wind rustling in the trees. I enjoyed that last hour’s ride home and it almost made me long for the coming fall when almost all of my rides will be in the dark.

Almost 5 hours after leaving work I was home.

A long weekend around Mt St Helens

Last weekend Christine and I took a 3.5 day vacation away from Seattle. On Friday we drove down to Lake Trout, WA for a couple of days of camping and rafting to celebrate our friend Sam’s 30th birthday. We extended the trip until Monday to celebrate our 7th wedding anniversary.

The rafting was a ton of fun. We went over a 10 foot waterfall and hit a bunch of other Class II, III, and IV rapids. Our guide kept the flatwater part interesting by having Nate (Sam’s husband) guide the raft.


Another group goes over the 10 foot waterfall.


Nate takes over for our guide and leads us down the river. He made the boring flat part of the river more fun by making sure that we never went straight.

Sadly the goal was to suprise Sam for her 30th, but the Forest Service made this difficult. We were all going to meet at Atkisson Group Camp (aka Atkisson Sno-Park), but the Forest Service directions are very very wrong. Their directions say “Highway 141 north 15 miles to Forest Service Road 2400 (5 miles south of the town of Trout Lake). Turn northwest 3.5 miles to the Group Camp.”

At 15 miles on Highway 141 you are nowhere near National Forest and are in the middle of some rural housing. There are a lot of dirt driveways, but few have signs and none are marked as Forest Service Road 2400 and few even go northwest. All of the cars trying to get there drove up and down this stretch of 141 trying to find the camp.

It turns out that the camp is all the way at the end of Highway 141, near mile marker 29. It is on a road called Forest Service Road 011. Once we all found the camp (at about 9:30pm, 3 hours after the first folks were to arrive) we had a wonderful dinner of garden burgers and turkey burgers and chatted and watched the stars.

Saturday after the rafting we hung out at the group camp again and grilled up some Salmon and other fresh fish. Since this group camp is really a sno-park it had an abundance of asphalt and somehow we all ended up spending more time sitting on it than on the dirt.

It was a good time.

Sunday we said goodbye to everyone but Nate and Sam and headed west towards Mt St Helens. We took the slow and scenic route on the logging roads and stopped for a few great views:


Sam, Nate, Alex and Christine standing in front of Mt Adams


Mt St Helens (notice the missing top) from the south

Once at Mt St Helens we drove up to the Ape Caves. This is a roughly 2 mile long natural tunnel that was made with hot lava during an eruption 2000 years ago. You can walk the length of it accessing it from two different entrances. We didn’t really have the right footwear and lighting gear to walk the whole thing, so we explored it from both ends,starting with the top.


The upper entrance into Ape Caves


The ceiling had this strange silver reflective glow


A cavern illuminated only by the flashlights of other groups walking through


Returning to sunlight and warmth

After a few hours of exploring the caves we found a resturant for dinner and bid goodbye to Nate and Sam.

On Monday Christine and I celebrated our 7th wedding anniversary by going to Mt St Helens. We’ve lived in Seattle for 10 years and have never been to Mt St Helens. Sadly it was a little hazy that day,but it was still an incredible place to visit. The mountain errupted 26 years ago and foliage is just starting to come back. I imagine that the moon might look like this if life started to take over. Here are a few photographs from that day:


Fallen trees in the foreground with Mt St Helens in the background. These trees were blown over during the eruption.


Coldwater Lake was formed when falling chunks of Mt St Helens clogged up Coldwater Creek. It didn’t exist 27 years ago.


Life starts to return on Mt St Helens. You can see how brown the terrain is just in front of the mountain, but how green it is around the mountain. The lake is Casper Lake, which was created during an earlier eruption.

Mt St Helens was an incredible place. I hope that we don’t wait 10 years to return again.

There are many more photos. I hope you enjoy them.

Fort Warden (near Port Townsend) is nifty

A few weeks ago we were in Port Townsend for a wedding. I hadn’t really spent any time there in about 8 years and remembered enjoying Fort Warden so Christine and I hung out there for a few hours before heading back home.

Fort Warden is built right up to the water and into the side of a sand dune. Most of the structure is still there and open for exploring.

Here are a few photos.


The Fort really is right up against the water. The circle in the foreground held one of the unique “disappearing” guns that could raise and lower.


All of the passages and rooms underneath are open and dark.


Just a cool photo of some old Fort stairs.

These photos are also located here: http://alexandchristine.smugmug.com/gallery/1763158/1/87445870

Anyway, it’s a good place to explore if you are in the area. I’m sure that I’ll return.

Little Si Hike

On Wednesday my team at work took the day off and went hiking instead. We picked Little Mount Si (near North Bend), hiked to the top in time for lunch, headed back down and stopped for some ice cream. I love this sort of team building/morale event because it gives all of us a chance to talk about non-work stuff for the day. Other teams like to go to movies. They can be nice too, but don’t really give youa chance to get to know anyone better.

We had great weather for the hike. It was a little cloudy, but this kept the sun off of us and added a little drama to the scenery:

Here we are sitting at the top:

More photos can be found here: http://alexandchristine.smugmug.com/gallery/1783233

The kitchen is done

I consolidated many photos to a gallery on smugmug:

http://alexandchristine.smugmug.com/House/219581

Christine sat down yesterday afternoon and anotated many of them.

I’m glad to be done with the work, and at the same time I’m already planning our next few projects. I want to do a minor remodel (mostly painting) of the downstairs bathroom, would like to rebuild the upstairs deck, paint the guest rooms, and we’re already thinking about our next huge project, re-landscaping the back yard.

alex

A portable CO2 setup for serving homebrew out of kegs

This year I’m supplying homebrewed beer to two weddings. One was last weekend and it was a big success. I brought 4 kegs of beer and returned with no beer.

Having a keg system is great at home, but more of a pain when serving beer at parties or other events. The CO2 cylinder that I use holds 20 pounds of CO2 and weighs even more and is difficult to travel with.

An alternative is to use the little disposable 12 gram CO2 cartridges. A company makes an adapter that will connect of these to a soda keg (used by many homebrewers), but it takes 3 12g cartridges to dispense a full keg. The cartridges cost about $1.50 each and aren’t reusable and don’t keep a steady pressure on the keg.

Paintball guns use small CO2 cylinders which are refillable, but they don’t use a standard fittings. I’ve asked around for a little while, but none of the homebrew people that I knew had a way to hook them up to a standard regulator. Paintball gun regulators output a much higher pressure than what you need for beer and aren’t very stable.

While flipping through Zymergy I found a little blurb on a company selling beverage regulators for paintball CO2 bottles. They sell entire kits, or just the fitting for the paintball CO2 cylinder. A friend offered to give me some paintball CO2 cylinders and I already had some CO2 regulators, so I just bought the adapter fitting from them. You can do this if your regulator takes 1/4″ NPT left hand thread fittings (most beverage regulators do, most welding ones do not).

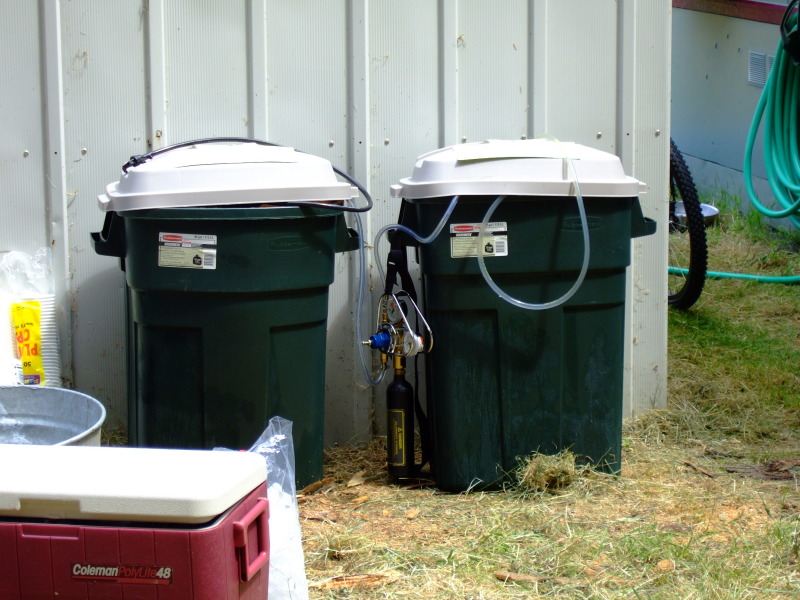
Everything arrived and I put it together just before last weekends wedding. You can see the final result in the photo above hanging between the trashcans. We served 4 full 5 gallon kegs and the bottle appears to have plenty of CO2 left. The whole setup (regultor, beer lines, two paintball CO2 cylinders) was small enough to carry in a plastic shopping bag.

This would also work great in an apartment if you wanted to keep beer kegs in your kitchen fridge. The small paintball CO2 cylinder is much smaller than a normal 5# or 10# CO2 cylinder. You can buy kits for refilling them from regular CO2 cylinders with a special kit or get them refilled at a paintball shop. It cost me $4 and about 5 minutes to refill a 16oz cylinder at the local paintball shop.

This would also be a great thing for a homebrew club to own and rent out to it’s members for parties and other events.

Maji discovers body art…

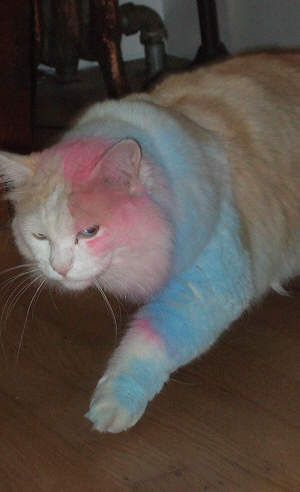
I woke up on a recent Sunday morning to find that my white and orange cat was now pink, blue, and orange. We gave him a bath, then he ran outside and colored his fur again using some neighborhood sidewalk chalk.

I’m expecting him to come home with tattoos and body piercing any day now.

Dreaming of cargo bikes…

When I was a kid I went with my family to Zimbabwe a few times to visit relatives. One of the things that I remember from these trips were the basic cargo bikes. They used a smaller front wheel so that they could fit a huge basket.

I often integrate the bus into my bike trips so most cargo bikes or XtraCycle conversions wouldn’t work for me. While thinking about this I remembered those African cargo bikes and thought it would be cool to make one.

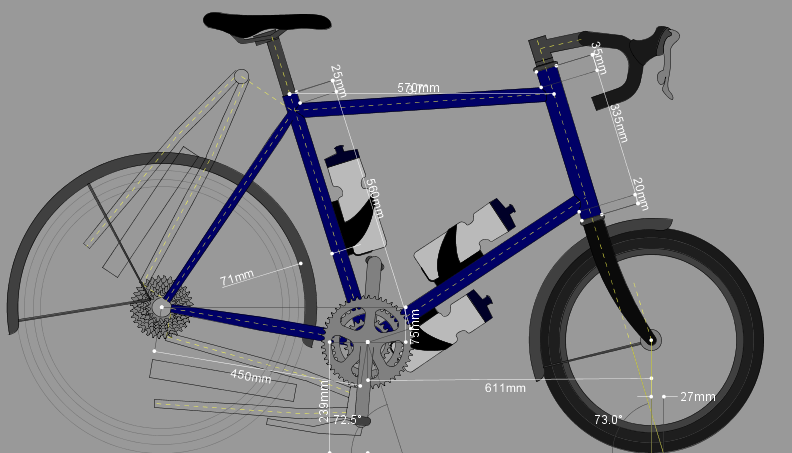
Here is what I came up with:

The rear wheel is 559mm, but the front wheel is only 406mm. The rest of the geometry is fairly typical touring bike geometry, except for much lower trail (to work well with big loads up front). It should be possible to fit a huge basket or flat rack on top of that front wheel. It shouldn’t be a big deal to carry a few grocery bags or a large box up front. The wheelbase is about the same as a normal bike, so it would work with normal bus mounted racks. Some folks will find the use of drop bars on a cargo bike to be weird, but I find flat bars to be weird. Flat bars would offer a little more cargo space, but I think that the bars are high enough off of the front wheel to prevent this from being a big problem.

I made this in BikeCADand the .bcad file is here.

Now I just near to learn to braze or weld…

Bike Distance/Time vs Car Distance/Time

I was talking to a friend today about a bike ride that I had just done and he seemed amazedat how far I had gone. I was thinking to myself that it seemed like a short ride. I had only ridden from Ravenna down to the north end of West Seattle and back to Lake Union.

While coming home I realized that this is probably a case of bike distance/time vs car distance/time. Cyclists (and pedestrians) move at a fairly constant rate no matter where they are riding. True I might climb more slowly or descend more quickly than my average speed, but at the end of the day my riding speed is pretty much always the same.

Cars are different. Some roads are built for very high speed travel and some are built for low speed travel. It takes me the same amount of time to drive to my mother in law’s house that is 4 miles away as to drive to my office that is 15 miles away. The big difference is that I have to take 30mph speed limit roads with lots of traffic signals to the mother in law’s, but I can drive at 60mph with no lights to get to work. Distance isn’t the most important factor here, it is the type of road and the number of traffic intersections.

I think this is one reason why I love city cycling. In the highest density parts of most cities there is no advantage to being in a car vs being on a bicycle when you look at the time that it takes to get from point A to point B. A 4 mile car ride that takes me 20 minutes (common in Seattle if you are going east/west) means I’m only averaging 12mph. On a bicycle I can pretty easily get the same average and I get some exercise and don’t have to look for parking. Isn’t being a cyclist great?

I should probably stop communicating bike trips in miles and just communicate them in time.

alex

Loaded Touring with the Kogswell P/R Prototype

The Kogswell Porteur/Randonneur (aka Kogswell P/R)is getting a lot of buzz in online forums as an exciting new bike. The most interesting this about this bike is not the weird wheel size (584mm aka 650B), or being the first TIG welded Kogswell, or the fact that it fits wide tires. The most interesting thing about this bike is that uses a low trail steering geometry. Just to give customers many options Kogswell is selling the bike with three different forks to allow the customer to tailor the steering geometry and handling of thebike to their needs.

Jan Heine, Mark Vande Kamp and I evaluated the handling differences of the three different forks for Vintage Bicycle Quarterly in Volume 4,Number 3. As a result of that testing I found that I preferred the fork with 40mm of trail. It works well unloaded or with a light rear load and best with a front load.

This was a difficult trip for me to pack for. I was planning on riding the Vancouver Island logging roads with stretches as long as 3 days between towns, so I knew I couldn’t go ultralight. I also was carrying a 5.5lb tent for two instead of the 1.5lb hammock that I’d carry if I was riding solo. While touring I like to use my Cobbworks Oyster Bucket panniers even though they are a little bit heavy because they are waterproof and make great stools in camp or at rest stops.

While planning for this trip I knew that the bike would do best with a front load, but I also wanted to get away with carrying only two panniers and the buckets work best on the rear. As a result my original load looked like this:


Rear Heavy Load (photo by John Speare)

I put most of my food into the front handlebar bag, clothing into one rear bucket, the stoveand a few misc items into the other bucket, and my tent, sleeping bag, and sleeping pad on top. I did not weigh my gear before leavingbut I’d guess that I had about 25# on the rear of the bike and 10# on the front. Lifting the bike made it obvious that there was a heavy rear bias.

It wasclear from the first ride around the ferry terminal parking lot (and sadly 3 hours from home) that this was not the ideal setup. The rear load made the front of the bike too light and the bike would easily shimmy. Larry (a touring partner) pointed out that my buckets were located behind the rear axle,so I slid them as far forward as possible and this helped a great deal,but the handling was still not very good.

That night I thought about how to fix the bicycle’s handling. I knew that I needed to get a front rack, but I didn’t think that putting the buckets on a lowrider rack would leave me with the necessary bag capacity. I still needed somewhere to put my tent, sleeping bag, and pad. I considered using compression straps to fasten those to the rear rack, but decided that I ultimately needed to get some panniers for the front. The Ortlieb Backrollers that I use for commuting were on their way out anyway (after 10 years of daily use), so I decided to purchase a new pair.

The next morning I visited some bike shops in Victoria, BC and purchased a pair of panniers for the front and a lowrider front rack. I moved everything that was strapped down to the rear rack to the front along with a few items from my buckets. It was obvious from my first lifting of the bike that the weight distribution was much better.

This is what the bike looked like with the new gear:


Balanced Load (photo by John Speare)

It was clear that the handling was much better even after a couple of miles. Lesson learned, low trail really does mean having a front or balanced load.

Once properly loaded the Kogswell P/R worked nicely as a loaded tourer. This bike was designed around wide tires and I ran it with the 36mm wide Panaracer CdlV. This tire worked very well on pavement, crushed limestone trails, and dirt logging roads. Even with a heavy front load the bike was comfortable to ride all day, never fought me in the corners, andcould be ridden no hands for short periods.

My bike is a prototype and the list of brazeons differ from the production bikes. The prototype had almost everything that I’d want for touring, but I’d still let to see a few additions. The highest priority would be having a third waterbottle cage location mounted under the downtube. Two bottles of water is good, but three is even better. My prototype didn’t come with mid-fork brazeons for a front lowrider, but I know that they have been added to the production frames. Otherwise the bike has everything necessary for loaded touring.

On my next trip I think I’ll concentrate on having a load biased towards this front. This will probably mean using the same handlebar bag, two buckets mounted on front lowriders, and a large saddlebag in the rear with no rear rack. I think that this would have provided the capacity needed for this trip while optimizing the load balance for this bike. For an overnight trip I would probably use only a handlebar bag and two small front panniers.

When I sold my previousloaded touring bike I was wondering if I made a mistake in assuming that the Kogswell P/R would be up to this sort of use. After 5 days on the road I’m here to report that it is, as long as you are careful to put at least half of your touring load up front. The bike really is a joy to ride when well loaded and I hope to use it on many trips to come.