Made A Cycle Truck Rack

I had a little bonus free time on Friday so I built the rack for the Cycle Truck. It is 18 by 20 inchesand made of 1/2 inchdiameter cromoly tubing with a 0.035″ wall thickness.

The rack itself is very basic and didn’t require much tricky work. It is a 2 dimensional rectangle and doesn’t have any stays or back stop (a back stop is not necessary since the head tube acts as one).

The connection between the rack and frame was the hardest part of the project. The frame has two support bars brazed to the cargo tube. These are made from 5/8″ square tubing and are mitered to fit around the cargo tube. I was careful to make sure that these were square to the cargo tube and head tube in the horizontal and vertical planes.

The support bars have 6mm holes at each end that the rack mounting bolts run through. The bolt, support bar, and rack look like this when connected together. The bolt goes into a threaded pillow block that I made on the lathe. The pillow blocks are brazed onto the rack. I thought about just brazing the rack directly to the frame, but wanted it to be removable so that I could easily replace it (if it gets damaged) or exchange it for a cargo box if I end up making one of those.

The hardest part was getting everything to line up well. There is no tolerance for error in the fitting of the pillow blocks to the support bars, the distance between bolt holes and the threaded part of the pillow block needs to be exact. What worked best (after some bumps along the way) was to braze the rear support bar to the frame, then thread bolts through the pillow blocks. The rear pillow blocks were tacked to the rack, then I placed the front support bar on the cargo tube and did the same thing there. Since all of the bolts were in place during the brazing everything was perfectly aligned.

I’ve done some load testing around the neighborhood with a 40lb load and the rack and bike handled well. I’ll be doing more rigourous testing and with higher loads later to see if I’ll need structure tying the rack to the frame. I expect that I’ll be adding two more stays that go from the rear support bar to the top of the head tube. This will both add some rigidity and will give me a nice place to mount water bottles. My goal is for the bike to ride nicely with loads in the 50-75lb range.

On Sunday I used it to carry this bulky but fairly light load. This is the kind of stuff that is really a bit too big for a normal porteur rack but small enough that I don’t like having to pull my trailer out for it. The Cycle Truck fits that niche between trailer and porteur nicely and I think I’ll be using it quite a bit.

I’m reorganizing the Cycle Truck photos into a new galleryto try and make it easier to understand the whole process without having a lot of extra photos. My only regret in this project is that I often got too involved and forgot to pick up the camera and take a helpful photo or two.

Some Projects Wrap Up, Others Begin….

I rode about 60 miles on the Cycle Truck during the last week. During the week I was just riding it as a naked bike, but yesterday I fashioned together a basic container using a recycle bin and some muffler clamps. It’ll do until I have a chance to build a real front rack (right now I’m waiting on metal, tools, and my bag!).

Muffler clamps and U-channel make a temporary rack

Alistair gives it a spin around the block

I really enjoyed those 60 miles. It’s really exciting to ride something that I built and have it work. This brazing stuff is addicting. The Cycle Truck handles well but my temporary cargo box is pretty mediocre and has a lot of flex in it. There is more to do too (building the rack, a lot of finishing work, re-routing the shift cables along the top tube, installing fenders). I still hauled a decent amount of stuff in it this weekend and the bike is already proving it’s worth. I’ll probably keep quiet on the Cycle Truck until the new rack is done.

The deck is complete. We used these neat hidden fasteners called EB-TY so it just looks like one great expanse of wood. It is sectional so we can partially disassemble it should we need to do any roof repairs. We still need to put a railing up, but it is really nice to see the deck finished. I think the tigerwood looks pretty cool too.

After today’s riding and deck building I celebrated with this nice dinner:

Salmon (from Loki at the farmer's market), pea+broc+tomato salad (also all from the market), a little sticky rice, and some La Fin du Monde

I promised some new projects too. Today I rode out to Aaron’s Bicycle Repair and picked up a SRAM i-Motion 9 hub. This is going on a Bike Friday Tikit. I know, I already converted a Bike Friday Tikit to have an internal hub gear (and now even Bike Friday is doing it). I have something up my sleeve for this conversion that’ll make it more interesting. The hub came from Aaron’s Bicycle Repair (what other shop in the US stocks all of this internal hub gear stuff) and came home on the Cycle Truck.

The other project is a mountain bike. I sold my mountain bike at the swap a few years ago and haven’t missed it. My cyclocross-ish IvyCycles and RB-T do nicely off road almost all the time. However we’re spending a week surrounded by mountain bike trails late this summer and I thought it would be nice to have a real mountain bike available. If I don’t ride it much compared to the IvyCycles then it’ll be on the chopping block. If I find that 60mm tires really do make a difference compared to 40mm ones then it might stick around. I bought the bike as a single speed but will be putting a Rohloff rear wheel (which is going on yet another future project) on it for now.

Wheels and a saddle came with the bike too

Realized

Imagined:

Realized:

Full photo set.

Next steps — Build it up(they knobby rear tire isn’t staying) and ride it, then build a rack for it. Alistair helped me with alignment today and took a few photos too. The framebrazing is done except for a couple of water bottle bosses and whatever other brazeons I realize that I forgot.

We measured the angles today, around 71.5 seat tube angle and 73.5 for head tube angle. Fork offset is around 30-35mm (this is a fork from a Bike Friday Family Tandem) giving a trail of about 35-40mm and flop of about 10-11mm. Right in the ballpark.

A little bit of progress on everything

I have nothing finished to show, but I have progress on the deck, cargo bike, and my bicycle jig.

The deck is half done. We were hoping to finish it this weekend but the 90F weather kept us off of the roof. We’re also waiting on 5 more boards to be delivered. The new decking is Tigerwood (from Ecohaus) and I really like how it looks so far. We’re using hidden fasteners called EB-TY. It took us a little while to figure out the best way to build the deck (especially because we are doing it in sections so that it can be disassembled), but now it is going pretty fast. Hopefully we can finish it up next weekend.

I’m embarrassed to show these photos of the cargo bike and fixture in progress because they show how much of a slob I can be about my workspace. The basement is a disaster, but I never feel like stopping work to tidy up.

The CAD drawing has been updated. There are a few changes and I switched the drawing to much easier to work with software (TurboCAD, I was using QCad).

/P>

Real progress on the cargo bike is occuring on two fronts. The first is building tooling that will be used on any frames that I built. I have most of the front triangle fixture completed. I’m building my fixture around a milling table that is 9 inches by 36 inches with 3 T-Slots running the length of the table. This table is accurately machined flat (not as perfectly as a surface plate, but well enough for bicycle frames) so I can also use it as an alignment table.Everything will be modular so that I can use the same base for building forks, rear triangles and other things.

Here is the table setup as a front triangle jig:

The bars under the seat tube and head tube are made from pieces of 80/20. They have T-slots in them too and are connected to the table using some brackets that I made. The brackets connect to the 80/20 usingT-Nuts that 80/20 sells and to the T-Nuts for the milling table. The milling table T-Nuts are setup for 1/2-30 bolts that are huge, but I bought some reducing bushings from McMaster-Carr that let me use smaller bolts. I can adjust them to any angle (using a protractor to check the angle) and then lock them into plate.

The tubing is held in these towers which are also primarily 80/20 with tube holding cones that I made on the lathe. I got the idea for these towers from a bicycle jig on Instructables, but changed the setup to be height adjustable. I shouldn’t need to adjust it once the whole thing is dialed in.

The bottom bracket is held in place with a vertical post and cones which sit on it. This is sort of an exploded view, with the top cone loosened. Everything is clamped in place with two clamping collars.

The other progress is on the cargo bike itself. As you can see in the first photo the donor frame has had it’s paint stripped (where I need to braze to it) and the headtube and downtube have been cut off.

The cargo tube on the cargo bike has some really tricky mitering. I built a fixture to do this miter (and others) on the lathe. This is what the mitering fixture looks like: (I’ll take some photos of it in use next time I’m using it).

It mounts to a T-Slot in the lathe’s compound slide. I can set the angle to on the compound slide to my miter angle and then use a hole saw to make the cuts. That block was made on the lathe and boring a 1.75″ hole took a long time. I’ll be able to use it for other tubing sizes with some reducing bushings that I need tomake. The mitering fixture works really well,but I need to tweak it a bit to get it better centered. Right now the miters are about 1mm off of center.

In that photo you can also see one of my test joints (I’ve made three of these and cut the other two apart). I’m pretty happy with the brass penetration that I’m getting,but the brazing looks a little sloppy and will require cleanup work. I’m getting better with practice, these big joints are a lot different than the little ones that I make for racks.

The joint is neat because the smaller tube completely pierces the larger one. When looking at it from the end you can see light coming around the smaller tube:

Hiking in Salt Lake City

After my couple of days in Spokane I visited Salt Lake City and Tuscarora, NV with my mom (who lives in DC). That was a great trip and I’ll write about Tuscarora in a future blog post.

I was more impressed with Salt Lake City than I expected to be. The city itself wasn’t too attractive to me, with huge superblocks downtown and a what seemed like car centric shopping areas that we farther than walking distance from most housing (even in the Sugar House District). It was flat and compact though, which would make it great for bike based life.

What I was really impressed with was the complete lack of suburbs because the city is literally right next to the mountains. In 10 minutes I could drive from the Sugar House District to Mill Creek Canyon (which appeared to offer the closest hiking)and get in a hike. My flight out was hours later than my mother’s, so on my last day I did exactly that.I bid farewell to my mom after breakfast and headed east towards the mountains. I parked the car around 10am.

Peek-a-boo views across Mill Creek from Thaynes Canyon with patches of snow in front.

I did a loop where I started going up Thaynes Canyon. The hike up was in moderately dense forest right up a canyon. Not much in the way of views, but lots of climbing and it felt good to be exerting myself after a few days in the car. When I hit snow (yes, I hiked to the snow line 15 minutes from downtown SLC in June) I turned around and took a spur trail trying to find better views.

Looking across Mill Creek to the other side.  Great views for 15 minutes from downtown SLC!

The spur that I found hit the jackpot. There were great views across Mill Canyon to the mountains on the other side. I hooked up with Desolation Trail and was able to take that all the way back to the car.

By 12:30 I was back in town eating lunch and enjoying a beer. At 2pm I was at the airport getting ready to fly back to Seattle.

I’m always jealous of my friends in Olympia and Spokane because they have great rural road cycling just minutes (by bicycle!) from their urban houses. Now I’m jealous of Salt Lake City for having great hiking and mountain biking so close into town as well.

Saturday morning by bicycle

Last Saturday was my favorite kind of Seattle Saturday morning.

I left the house around 8:30 armed with a moderate sized shopping list and a bike trailer. In the next three hours I visited an interesting garage sale (noted because they listed a lathe in their ad) where I bought some useful tools at reasonable prices. As I biked down Stone Way I found this interesting cargo bike hanging out by a clothing shop. I’d noticed it before, but this was the first time that I got to stop and really check it out. It’s somewhat similar to the cycletruck that I’m building:

Onto the hardware stores where I bought fasteners for my frame jig and the deck that we are building off of our bedroom. Seattle is blessed with some great hardware stores including Stone Way Hardware and Hardwicks, both of which I visited on Saturday. Stone Way Hardware was absent it’s bike rack, I found out that it had been knocked off of the sidewalk during a car accident. I emailed the city and theysaid it would be fixed in a month or so.

My final stop on the ride was the farmer’s market. There I ran into a few friends and bought some fresh salmon, pork and steak for Christine, fresh eggs, strawberries (Seattle has the best strawberries anywhere, even in an off season like this one), salad makings, and of course a pastry.

This is what the trailer looked like when I got home (after unloading most of the pershables…but I had to put the strawberries back in for the photo). This would be a good load for the cycletruck once I’m done with it.

Unloaded it and made my normal Saturday morning omelette. In the afternoon Alistair Spence stopped by for a quick visit and I made some progress on the cycletruck and frame jig. In the evening Christine and I went for a nice dinner and visited yet more hardware stores picking up the last items for our deck. I wish I could have relaxing but busy days like this every day of my life.

Badger Lake S24O — Spokane

I’m visiting with John Speare for a couple of days and last night we did one of his favorite S24O’s out to Badger Lake. It’s a great ride, with the way out having a mix of gravel and paved rail trails and old dirt/grass roads and the way back having other dirt/grass roads and a nice just barely downhill descent back into town. A tailwind and tiny descent really makes one feel fast. The climb back up to South Hills along some unnamed dirt trails makes you feel slow again.

We passed through lots of neat scenery and some of the normal long straight rail trail stuff. We passed through Turnbill Wildlife Reserve which had nice ponds and lots of birds.

The camping was nice. Quiet, good views of the lake, good places to hang hammocks. It’s one of those places that makes you glad to have a hammock…I didn’t see any good spots for a tent.

Now we’re prepping for the 6pm BBQ. If you live in Spokane then stop by at John’s (apparently the bike folks know where it’s at).

Tomorrow I’m off to Tuscarora Pottery School in Tuscarora, NV and hanging out with my Mom.

More pictures.

Deck (or lack thereof)

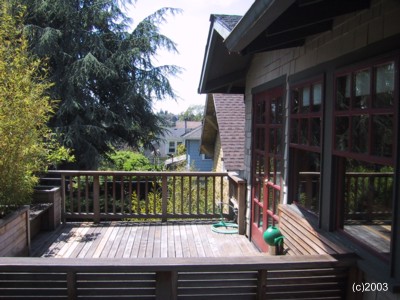
We’re replacing the roof deck that is off of our bedroom. It’s about 15 years old and most the cedar was starting to rot away. This blog entry is mostly to show that I’m sometimes busy with something that isn’t a bicycle.

This is what it looked like when we bought the house:

Removing the deck might end up being almost as much work as putting the new one in. You can’t see them too well, but there are 3 planters on the left. The middle one was about 4 feet wide, 2 feet deep and 2 feet high. It was full of golden bamboo which had become incredibly root bound. I cut (with a Sawzall) the soil up into cubic foot chunks with the bamboo still intact. The roots were so intertwined that this wore out 3 or 4 Sawzall blades. That took hours. We sidewalk recycled the bamboo and kept the plants from the other two planters.

Once we got those planters off and the built in seating that went 1/2 way around the deck we were able to get the decking itself off. That went reasonably quickly. Many of the sleepers were rotten through and you could just pry the boards apart and have the screws pop out.

This is what the remains looked like down below in the back yard. We had to be careful not to take out our neighbor’s cable when dropping lumber.

And here is our clean roof:

We’re talking to a roofer to make sure that our roof is in good shape before building the new deck. We’ll be building the new deck in 4 sections so that it can be removed if we do need to work on the roof later. The decking itself is ordered, we went with Tigerwood from the Environmental Home Center.

We love our roof deck. It doesn’t get too much shade and is great for container gardening. The cats liked it too.

My new bike project — Cargo Bike

A year or two ago I drew up this design for a 20″ front, 26″ rear wheeled cargo bike and posted about it on this blog. This basic design is often called a cycletruck after the classic Schwinn sold around WW2.

The idea is that a smaller front wheel leaves more space for a big rack over the front wheel. The nice thing about this design is that the wheelbase is normal (so I can easily store the bike), but it has a pretty large hauling capacity. James Black extended this design in his cycle truck (built by David Wilson) by using a large boom over the front wheel to support the rack and 20″ wheels front and rear to allow for a low rear rack too. His cycle truck is probably the best of the compact cargo bike designs that I’ve studied or ridden.

One of my planned brazing projects has been to build a cycletruck of my own. I wanted to keep it simple, so I’m starting with a donor MTB frame. Yesterday I was going by Recycled Cycles and found the perfect frame on their free rack — a ~1990 Trek 800 in my size. To most people this is pretty junky, but for this project it’s exactly what I needed. The tubing is unbutted, so I can cut off the head tube and braze on a new one without worrying about where the tubing gets thin. It looks like it has already lived a good life, so I don’t feel bad chopping it up. I also have an old Bike Friday 20″ fork that will work nicely for the front wheel.

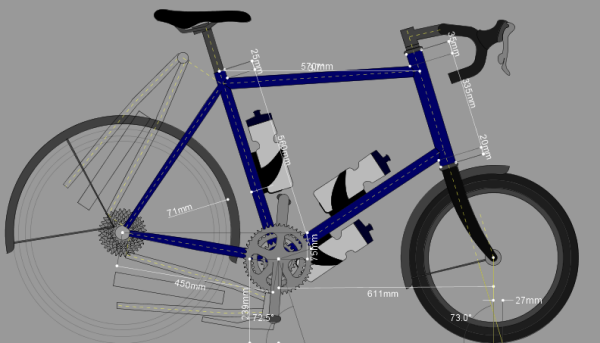
Here is the CAD drawing of what I plan on doing to it (click for big if you want to read dimensions):

The plan is to braze on a new head tube which is longer and steeper (73 degrees vs the 71 degree HTA on the bike today). Then I’ll run a 1 3/4″ x 0.058″ tube from the seat tube, around the head tube, and sticking out over the front of the bike. The original downtube will miter into this (or I’ll make a new downtube that goes from the BB to the base of the head tube). A roughly 18″ by 20″ rack made of 1/2″ tubing will sit over the front wheel.

It’ll be challenging for me, I haven’t done anything on this scale before. A few of the tricky bits are going to be making a nice through hole in that 1 3/4″ tube for the head tube and fixturing it to keep the frame well aligned during the brazing process. I’ll need to build tooling for some of that and plan on documenting my progress as I go. I have an aggressive goal of having this finished by the July 4th Cargo Bike Ride, but if I miss that target I won’t be surprised or feel too bad.

What shows up on a Cargo Bike Ride?

I’ve blogged about many of the Seattle Cargo Bike Rides. They happen on holidays and usually involve 20-30 people loading up their bikes with BBQ equipment, food, and beverages and heading out to a park for an enjoyable afternoon. They happen rain or shine, winter or summer. Yesterday was the Second Annual Memorial Day Jamboree, organized by Ro.

When this ride started it was almost all XtraCycles. Last year as a joke I brought a second bike with me (in a trailer) to have an “extra cycle” since I didn’t have an XtraCycle. In the last year the ride has diversified. There are more normal bikes and more varied cargo bikes. Here are some of the things that were on the ride.

Porteur/basket bikes:

Dan Boxer's XO-1 Porteur, using an apple box on a Nitto rack

Matt Newlin's Porteur

My bike with the rack that I built and a Pass and Stow/Freight bag.  You've seen it before

Haulin' Colin's Crate Bike.  I love this one and the crate setup is really rigid

Lee's basket on a handlebar bag rack LHT

Ro's porteur rack plus basket plus trailer Kogswell P/R

Ro’s photo is a nice transition into the trailered bikes:

Dave Shapiro and his Haulin' Colin Trailer

Joe's Haulin' Colin trailer complete with sound system.  This is Colin's most recent trailer.

Lightfoot Trailer, attached to a Lightfoot Trike

Then you get into the big cargo bikes:

Daniel's David Wilson front loader

A nicely appointed Surly Big Dummy

Val and the Dreadnought

Aaron Goss's unique stokemonkey equipped Bakfiets

Big Dummy with Bicycle Blender

Rounding out the collection there are a variety of “more normal” bikes and some fun bikes such as this really pretty tallbike:

EvilMike's Novara Randonee

I’m looking forward to the next one on July 4th. The people make the ride and the Cargo Bike rides always have a great group of folks show up.