Archive for the ‘Bicycles’ Category.

A little bit of progress on everything

I have nothing finished to show, but I have progress on the deck, cargo bike, and my bicycle jig.

The deck is half done. We were hoping to finish it this weekend but the 90F weather kept us off of the roof. We’re also waiting on 5 more boards to be delivered. The new decking is Tigerwood (from Ecohaus) and I really like how it looks so far. We’re using hidden fasteners called EB-TY. It took us a little while to figure out the best way to build the deck (especially because we are doing it in sections so that it can be disassembled), but now it is going pretty fast. Hopefully we can finish it up next weekend.

I’m embarrassed to show these photos of the cargo bike and fixture in progress because they show how much of a slob I can be about my workspace. The basement is a disaster, but I never feel like stopping work to tidy up.

The CAD drawing has been updated. There are a few changes and I switched the drawing to much easier to work with software (TurboCAD, I was using QCad).

/P>

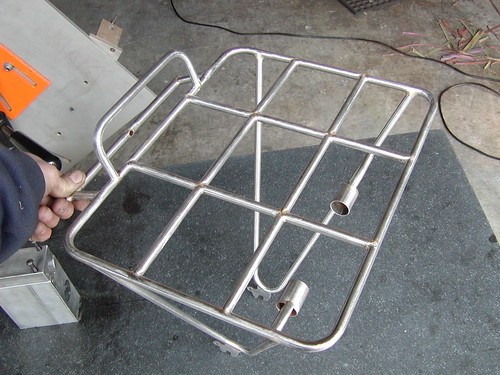
Real progress on the cargo bike is occuring on two fronts. The first is building tooling that will be used on any frames that I built. I have most of the front triangle fixture completed. I’m building my fixture around a milling table that is 9 inches by 36 inches with 3 T-Slots running the length of the table. This table is accurately machined flat (not as perfectly as a surface plate, but well enough for bicycle frames) so I can also use it as an alignment table.Everything will be modular so that I can use the same base for building forks, rear triangles and other things.

Here is the table setup as a front triangle jig:

The bars under the seat tube and head tube are made from pieces of 80/20. They have T-slots in them too and are connected to the table using some brackets that I made. The brackets connect to the 80/20 usingT-Nuts that 80/20 sells and to the T-Nuts for the milling table. The milling table T-Nuts are setup for 1/2-30 bolts that are huge, but I bought some reducing bushings from McMaster-Carr that let me use smaller bolts. I can adjust them to any angle (using a protractor to check the angle) and then lock them into plate.

The tubing is held in these towers which are also primarily 80/20 with tube holding cones that I made on the lathe. I got the idea for these towers from a bicycle jig on Instructables, but changed the setup to be height adjustable. I shouldn’t need to adjust it once the whole thing is dialed in.

The bottom bracket is held in place with a vertical post and cones which sit on it. This is sort of an exploded view, with the top cone loosened. Everything is clamped in place with two clamping collars.

The other progress is on the cargo bike itself. As you can see in the first photo the donor frame has had it’s paint stripped (where I need to braze to it) and the headtube and downtube have been cut off.

The cargo tube on the cargo bike has some really tricky mitering. I built a fixture to do this miter (and others) on the lathe. This is what the mitering fixture looks like: (I’ll take some photos of it in use next time I’m using it).

It mounts to a T-Slot in the lathe’s compound slide. I can set the angle to on the compound slide to my miter angle and then use a hole saw to make the cuts. That block was made on the lathe and boring a 1.75″ hole took a long time. I’ll be able to use it for other tubing sizes with some reducing bushings that I need tomake. The mitering fixture works really well,but I need to tweak it a bit to get it better centered. Right now the miters are about 1mm off of center.

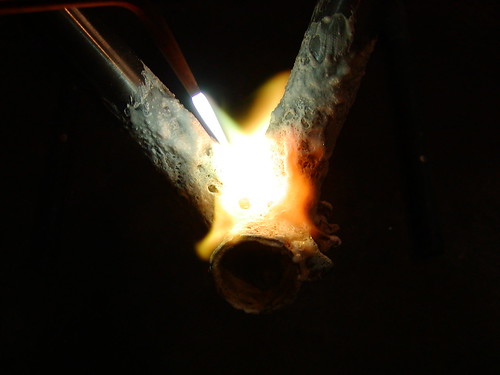
In that photo you can also see one of my test joints (I’ve made three of these and cut the other two apart). I’m pretty happy with the brass penetration that I’m getting,but the brazing looks a little sloppy and will require cleanup work. I’m getting better with practice, these big joints are a lot different than the little ones that I make for racks.

The joint is neat because the smaller tube completely pierces the larger one. When looking at it from the end you can see light coming around the smaller tube:

Saturday morning by bicycle

Last Saturday was my favorite kind of Seattle Saturday morning.

I left the house around 8:30 armed with a moderate sized shopping list and a bike trailer. In the next three hours I visited an interesting garage sale (noted because they listed a lathe in their ad) where I bought some useful tools at reasonable prices. As I biked down Stone Way I found this interesting cargo bike hanging out by a clothing shop. I’d noticed it before, but this was the first time that I got to stop and really check it out. It’s somewhat similar to the cycletruck that I’m building:

Onto the hardware stores where I bought fasteners for my frame jig and the deck that we are building off of our bedroom. Seattle is blessed with some great hardware stores including Stone Way Hardware and Hardwicks, both of which I visited on Saturday. Stone Way Hardware was absent it’s bike rack, I found out that it had been knocked off of the sidewalk during a car accident. I emailed the city and theysaid it would be fixed in a month or so.

My final stop on the ride was the farmer’s market. There I ran into a few friends and bought some fresh salmon, pork and steak for Christine, fresh eggs, strawberries (Seattle has the best strawberries anywhere, even in an off season like this one), salad makings, and of course a pastry.

This is what the trailer looked like when I got home (after unloading most of the pershables…but I had to put the strawberries back in for the photo). This would be a good load for the cycletruck once I’m done with it.

Unloaded it and made my normal Saturday morning omelette. In the afternoon Alistair Spence stopped by for a quick visit and I made some progress on the cycletruck and frame jig. In the evening Christine and I went for a nice dinner and visited yet more hardware stores picking up the last items for our deck. I wish I could have relaxing but busy days like this every day of my life.

Badger Lake S24O — Spokane

I’m visiting with John Speare for a couple of days and last night we did one of his favorite S24O’s out to Badger Lake. It’s a great ride, with the way out having a mix of gravel and paved rail trails and old dirt/grass roads and the way back having other dirt/grass roads and a nice just barely downhill descent back into town. A tailwind and tiny descent really makes one feel fast. The climb back up to South Hills along some unnamed dirt trails makes you feel slow again.

We passed through lots of neat scenery and some of the normal long straight rail trail stuff. We passed through Turnbill Wildlife Reserve which had nice ponds and lots of birds.

The camping was nice. Quiet, good views of the lake, good places to hang hammocks. It’s one of those places that makes you glad to have a hammock…I didn’t see any good spots for a tent.

Now we’re prepping for the 6pm BBQ. If you live in Spokane then stop by at John’s (apparently the bike folks know where it’s at).

Tomorrow I’m off to Tuscarora Pottery School in Tuscarora, NV and hanging out with my Mom.

More pictures.

My new bike project — Cargo Bike

A year or two ago I drew up this design for a 20″ front, 26″ rear wheeled cargo bike and posted about it on this blog. This basic design is often called a cycletruck after the classic Schwinn sold around WW2.

The idea is that a smaller front wheel leaves more space for a big rack over the front wheel. The nice thing about this design is that the wheelbase is normal (so I can easily store the bike), but it has a pretty large hauling capacity. James Black extended this design in his cycle truck (built by David Wilson) by using a large boom over the front wheel to support the rack and 20″ wheels front and rear to allow for a low rear rack too. His cycle truck is probably the best of the compact cargo bike designs that I’ve studied or ridden.

One of my planned brazing projects has been to build a cycletruck of my own. I wanted to keep it simple, so I’m starting with a donor MTB frame. Yesterday I was going by Recycled Cycles and found the perfect frame on their free rack — a ~1990 Trek 800 in my size. To most people this is pretty junky, but for this project it’s exactly what I needed. The tubing is unbutted, so I can cut off the head tube and braze on a new one without worrying about where the tubing gets thin. It looks like it has already lived a good life, so I don’t feel bad chopping it up. I also have an old Bike Friday 20″ fork that will work nicely for the front wheel.

Here is the CAD drawing of what I plan on doing to it (click for big if you want to read dimensions):

The plan is to braze on a new head tube which is longer and steeper (73 degrees vs the 71 degree HTA on the bike today). Then I’ll run a 1 3/4″ x 0.058″ tube from the seat tube, around the head tube, and sticking out over the front of the bike. The original downtube will miter into this (or I’ll make a new downtube that goes from the BB to the base of the head tube). A roughly 18″ by 20″ rack made of 1/2″ tubing will sit over the front wheel.

It’ll be challenging for me, I haven’t done anything on this scale before. A few of the tricky bits are going to be making a nice through hole in that 1 3/4″ tube for the head tube and fixturing it to keep the frame well aligned during the brazing process. I’ll need to build tooling for some of that and plan on documenting my progress as I go. I have an aggressive goal of having this finished by the July 4th Cargo Bike Ride, but if I miss that target I won’t be surprised or feel too bad.

Seattle Framebuilding Chat

(photo by Alistair Spence, from his flickr site)

A couple of weeks ago I posted a message on the framebuilders list inviting amateur and hobbyist builders to come over to my house for some beers, chips, and to talk about building bikes. Yesterday was the day and Alistair Spence, Dan Boxer, Joe Dube, Mark Bulgier, Eric Bailey, Colin Stevens (who helped friends move by bike earlier in the day) and myself met up at my house. A couple of others were interested, but couldn’t make it this month.

Mark brought a bucket full of lugs (sadly I didn’t take a photo) which we spread out on the table and which triggered a lot of conversation. He also had a couple of cut apart joints from some of his earlier bikes. Eric brought two forks and racks that he had been working on. Dan rode over on a bike that he had built, and Alistair had his highly modified Rivendell Porteur. I showed a bottom bracket post that I was building for my alignment table. Joe and Mark brought a lot of interesting stories about welding and we talked about Ti, brazing,lugs,dropouts and lots of other things.

Almost 5 hours, 15 or so beers, a bag of chips, much cheese and hummus later we parted ways. Everyone had a good time and we agreed to do it again in August. We’re going to rotate shops and will meet at Joe’s next time. Seattle isn’t Portland when it comes to the number of people building frames, but there is still a lot of interesting stuff going on here. By getting to know each other I think we’ll all be able to better share knowledge and develop our craft.

Great Rack Building Sequence from Alistair Spence

Alistair just finished up this large porteur rack for his tandem and posted an extensive series of photos documenting the process. He also annotated many of them, giving a lot of hints along the way. It’s recommended viewing if you are interested in rack building.

Some folks have been asking me in comments about tricks for making miters that aren’t 90 degrees. Alistair covers this well starting at this photo.

Another flickr gallery that I’ve been enjoying comes from Mike Flanigan of ANT Bike. He has a lot of shots showing his homemade fixtures.I’ve been interested in making fixtures of my own and there is a lot to learn from these photos.

Easter 2008 Cargo Bike Ride

Perhaps my favorite series of organized bicycle rides in Seattle are the holiday-oriented Cargo Bike Rides. These were started a few years ago by Val Kleitz and have grown to be well attended with a wide variety of bikes (cargo and not).

The Cargo Bike series has always skipped the spring because there wasn’t a handy holiday between New Years and Memorial Day. FieryIrie (aka Aden) realized this gap wasn’t really a good idea and started up the Easter Cargo Bike ride. I was sad to wake up to pouring rain on Sunday morning and almost talked myself out of going, but finally decided that a little rain shouldn’t keep me away and loaded up my bike and rode down to Myrtle Edwards Park.

I arrived and found 15 or so very wet souls hanging out under a roof waiting for the ride to start. I was amazed to see so many people — Seattle cyclists ride in the rain, but most give up when the rain is hard. Not the cargo bike guys, they were outside when most other cyclists were comfortably at home.

Aden wasn’t there yet, but quickly showed up with a borrowed XtraCycle full of spring flowers:

The plan was to ride north to Ballard to Honk Fest West and then onto Gasworks for some picnicing and a fire. The rain squashed the idea of watching marching bands, so we swung by Fred Meyer to pick up a rickshaw’s worth of fire wood then headed to the Gaswork fire places.

As we pulled into Gasworks another large cargo rickshaw joined us. This electric bike (it has two front hub motors) was pretty incredible and made from what seemed like half a dozen donor bikes. The owner/builder (I think her name is Segwey) has been working on it for a couple of years and is building another couple of them. She also makes a mean splitpea soup.

Full of soup, hot cross buns, warming beverages, and other food everyone congregated around the fires.

A couple of hours the sun dared to come out, leading to a dry and much warmer ride home.

This cargo bike ride probably had the least riding of any that I’ve been on, but was also one of the more fun. I hope to see more folks out for the Memorial Day ride — last year’s was the biggest Cargo ride yet.

More photos.

A new way home

I’ve lived in the same neighborhood for almost 10 years and have been working on the same campus for 12 years.I thought I had explored all of the good options for my bike commute home.

On Tuesday I was heading towards the intersection of 140th and 40th where I always turn right and thought “let’s see if the dead end street ahead is really a dead end”. I climbed a short but steep hill and saw a sign telling me that there were no options forward but three driveways. I kept going and found a little side path between two houses and out to 134th.

It was a nice way home for a muddy day when my favorite route is a bit slick. I won’t ride it every day, but I’ll probably ride it a couple of times a month.

Having lots of options keeps my daily commute fresh. My mixed-modal commute gives me lots of options, from taking the bus the whole way to a 25 mile ride over I90 or the Burke Gilman Trail. This new route is another variation on my favorite — roughly7 miles of riding followed by a 10 minute bus ride and another 3 miles of riding. I tried to count my commute routes yesterday, but realized that there are dozens or hundreds of variations that I take depending on my mood, the weather, traffic, and the season. Lots of bus, no bus, or some bus. Lots of dirt, no dirt, or just a short dirt cut through like this one. Going home via shopping to pick up groceries for dinner or riding home through old residential neighborhoods and enjoying the well landscaped yards. Every day is new.

How do you keep your commute fresh?

Freight Pass and Stow bag and prototype rack

One of the coolest booths for me at NAHBS 2008 was from Pass and Stow. Matt Feeney has designed a nice porteur rack that can fit on almost any fork and which has a good size platform (not huge, not tiny) and which can hold panniers too. He also worked with Freight Bags to develop a bag for the rack, and came up with a really clever attachment system based on “Lift the Dot” fasteners.

I bought one of the bags that was at the show as soon as I could. It arrived on Saturday and I quickly assembled this rack for it:

It looks a lot like most of the racks that I’ve made. It has one unique feature, which are the lift the dot studs on the bottom of the rack. There are four for them, one for each corner of the bag. The bag has four matching mounts and they click together like this:

This mounting system makes it very easy to install and remove the bag. It is a big improvement from bungie cords.

The bag itself is wonderful for commuting. It is large, much larger than a Ostrich or Berthoud bag. It is built like a messenger bag with a waterproof liner on the inside and a rough Cordura fabric on the outside. There is one large main pocket and a smaller front pocket that secures with velcro. The shoulder strap is made of seatbelt webbing and the bag is comfortable to wear as a messenger bag even with it’s unique proportions.

A cool feature that I missed at the show are “long flap” straps like the ones on a Carradice. This lets you overstuff the bag and ride with it wide open while having a secure load. I’m sure this will come in handy when stopping by the grocery store after commuting home.

There are compression straps on the side which let you cinch down the bag when it isn’t full. This is how it looks with my normal load:

The bag is a little wide for 42cm drop bars (I doubt that it was designed with drop bars in mind), but the width makes it possible for my (smallish) laptop to fit. I think it will be a more comfortable fit with 44cm drop bars and may switch.

I consider this rack a “prototype” because I experimented with a few things on it. I tried two different methods of making brazeons for the “Lift the Dot” studs. The studs themselves are threaded #8-32 with brass (pretty soft) bolts. The better mount that I made for them just consisted of a very short section of 1/4″ x 0.058″ tubing mitered and brazed to the bottom of the rack. After brazing I drilled out the center with a #29 drill bit and tapped for the #8-32 bolt. I also tried drilling 1/4″ holes in the rack and using a longer section of the 1/4″ x 0.058″ tubing, but that was fussier to keep aligned and required more work.

I also played with different methods of attaching the rack to the frame. I made a lug for the left stay by drilling out the center of 3/8″ steel rod to a 5/16″ hole (the same diameter as my rack tubing). I then filed down a tab to mount to the frame. My brazing on this is pretty ugly, but the lug looks nice and wasn’t hard to make. I think I’ll do it again:

I copied the Rene Herse fork crown mount and I’m pretty happy with how that came out:

That is a 180 degree half circle of 5/16″ x 0.035″ tubing. Mitered at the halfway point is another section of 5/16″ x 0.028″ and a M6 stud (long bolt with the head cut off) is brazed into that sleeve.

The backstop on the rack is brazed onto the back of the rack instead of the top, which gives it kind of a nice flow. It is a bit annoying to get all of the bends to line up correctly though, and my backstop isn’t exactly square with the rack. It’s fine for a prototype:

Great bag, good enough rack. You can order the bags through Matt and Pass and Stow.

Is it spring already?

I know the calendar says spring starts in about a month, but it feels like spring has already sprung in Seattle.

A young sunset on tonight’s ride home (the long way of course, we don’t get many warm sunny days in Feb in Seattle!):

The views from Queen Anne looking towards Magnolia and the Olympic Mountains on Sunday morning:

The photos don’t tell you how warm it is, but it’s been in the upper 50s. The mountains look inviting for some early season cycling or late season xc skiing.