Archive for the ‘House’ Category.

A little bit of progress on everything

I have nothing finished to show, but I have progress on the deck, cargo bike, and my bicycle jig.

The deck is half done. We were hoping to finish it this weekend but the 90F weather kept us off of the roof. We’re also waiting on 5 more boards to be delivered. The new decking is Tigerwood (from Ecohaus) and I really like how it looks so far. We’re using hidden fasteners called EB-TY. It took us a little while to figure out the best way to build the deck (especially because we are doing it in sections so that it can be disassembled), but now it is going pretty fast. Hopefully we can finish it up next weekend.

I’m embarrassed to show these photos of the cargo bike and fixture in progress because they show how much of a slob I can be about my workspace. The basement is a disaster, but I never feel like stopping work to tidy up.

The CAD drawing has been updated. There are a few changes and I switched the drawing to much easier to work with software (TurboCAD, I was using QCad).

/P>

Real progress on the cargo bike is occuring on two fronts. The first is building tooling that will be used on any frames that I built. I have most of the front triangle fixture completed. I’m building my fixture around a milling table that is 9 inches by 36 inches with 3 T-Slots running the length of the table. This table is accurately machined flat (not as perfectly as a surface plate, but well enough for bicycle frames) so I can also use it as an alignment table.Everything will be modular so that I can use the same base for building forks, rear triangles and other things.

Here is the table setup as a front triangle jig:

The bars under the seat tube and head tube are made from pieces of 80/20. They have T-slots in them too and are connected to the table using some brackets that I made. The brackets connect to the 80/20 usingT-Nuts that 80/20 sells and to the T-Nuts for the milling table. The milling table T-Nuts are setup for 1/2-30 bolts that are huge, but I bought some reducing bushings from McMaster-Carr that let me use smaller bolts. I can adjust them to any angle (using a protractor to check the angle) and then lock them into plate.

The tubing is held in these towers which are also primarily 80/20 with tube holding cones that I made on the lathe. I got the idea for these towers from a bicycle jig on Instructables, but changed the setup to be height adjustable. I shouldn’t need to adjust it once the whole thing is dialed in.

The bottom bracket is held in place with a vertical post and cones which sit on it. This is sort of an exploded view, with the top cone loosened. Everything is clamped in place with two clamping collars.

The other progress is on the cargo bike itself. As you can see in the first photo the donor frame has had it’s paint stripped (where I need to braze to it) and the headtube and downtube have been cut off.

The cargo tube on the cargo bike has some really tricky mitering. I built a fixture to do this miter (and others) on the lathe. This is what the mitering fixture looks like: (I’ll take some photos of it in use next time I’m using it).

It mounts to a T-Slot in the lathe’s compound slide. I can set the angle to on the compound slide to my miter angle and then use a hole saw to make the cuts. That block was made on the lathe and boring a 1.75″ hole took a long time. I’ll be able to use it for other tubing sizes with some reducing bushings that I need tomake. The mitering fixture works really well,but I need to tweak it a bit to get it better centered. Right now the miters are about 1mm off of center.

In that photo you can also see one of my test joints (I’ve made three of these and cut the other two apart). I’m pretty happy with the brass penetration that I’m getting,but the brazing looks a little sloppy and will require cleanup work. I’m getting better with practice, these big joints are a lot different than the little ones that I make for racks.

The joint is neat because the smaller tube completely pierces the larger one. When looking at it from the end you can see light coming around the smaller tube:

Deck (or lack thereof)

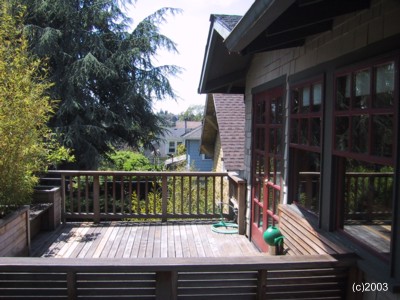
We’re replacing the roof deck that is off of our bedroom. It’s about 15 years old and most the cedar was starting to rot away. This blog entry is mostly to show that I’m sometimes busy with something that isn’t a bicycle.

This is what it looked like when we bought the house:

Removing the deck might end up being almost as much work as putting the new one in. You can’t see them too well, but there are 3 planters on the left. The middle one was about 4 feet wide, 2 feet deep and 2 feet high. It was full of golden bamboo which had become incredibly root bound. I cut (with a Sawzall) the soil up into cubic foot chunks with the bamboo still intact. The roots were so intertwined that this wore out 3 or 4 Sawzall blades. That took hours. We sidewalk recycled the bamboo and kept the plants from the other two planters.

Once we got those planters off and the built in seating that went 1/2 way around the deck we were able to get the decking itself off. That went reasonably quickly. Many of the sleepers were rotten through and you could just pry the boards apart and have the screws pop out.

This is what the remains looked like down below in the back yard. We had to be careful not to take out our neighbor’s cable when dropping lumber.

And here is our clean roof:

We’re talking to a roofer to make sure that our roof is in good shape before building the new deck. We’ll be building the new deck in 4 sections so that it can be removed if we do need to work on the roof later. The decking itself is ordered, we went with Tigerwood from the Environmental Home Center.

We love our roof deck. It doesn’t get too much shade and is great for container gardening. The cats liked it too.

Basement Progress

Jimmy gave me a good idea on the basement layout after my last post. Here is what I’m going for:

This setup combines the laundry and storage area and keeps them away from the workshop area.

In the last week I’ve built the new wall for the laundry/storage room. Rory came over on Saturday and helped me hang the drywall and plywood that finish it. I’ve been putting on drywall mud since Sunday and the last coat went on yesterday. The wall is drywall on the laundry/storage side and plywood on the bike/workshop side. Hopefully by this weekend we’ll be moving items into the new storage room from the old and preparing to take out the walls that made the old storage room.

Now that the wall is moving along I’ve been thinking about cabinets and workbenches. I have good enough wall cabinets scavenged from places like The Restore, but I’d like to get a few more cabinets with drawers. My best one right now is an old punch card filing cabinet, but those are very hard to find. It’s too bad because they are perfect for holding bike parts and tools. The drawers aren’t too deep, they are very well made, and 20 years ago they were being thrown away everywhere.

Since I can’t find another punchcard catalog I’ve been looking at some stuff actually built for basements and mechanics. The Gladiator stuff made by Whirlpool has caught my eye. It is a little pricey, but appears to be well made, is on sale at Sears, is domestically produced, and is nicely modular. I like that the cabinets roll around, fit under the workbench, and you can mount a small worksurface on top of them.

It won’t be this fancy (this looks more like a kitchen than a workshop), but I might end up with a couple of pieces:

Wet!

We’re having record rains in Seattle.Seattle is known as a wet place, but I usually think of it as a damp place. It rains a lot here, but not very hard. This weekend that changed and we’re getting a few inches of rain per day.

This morning I woke up and checked on the basement and found water. The storage room had a 1/4″ puddle across most of it and it was making a little stream running across the basement floor to the low spot on the other side of the house. We’ve had flooding like this in the past, so I wasn’t too surprised. However I was getting sick of vacuuming a few gallons of it up every 30 minutes, so I checked outside.It’s just a little damp now, but this room had a lot of standing water this morning. In the second photo you can see the remains of the stream that ran across our basement.

Our house has french drains and I found that the east-side one was not functioning. The water was leaking out of the inlet pipe at a high rate and pouring down the foundation wall where it would come up through cracks in the floor. Christine and I made a hasty attempt to patch it with duct tape, but it was clear that wasn’t going anywhere. So we went to the hardware store and bought 50′ of new gutter downspouts. Now we have a temporary and very hacky gutter system, but the basement is dry. Our french drains were built with the wrong type of tubing, so we’ll probably need to repair/replace them instead of just being able to clean them out.

The temporary gutters:

We’re lucky, I know that many other houses in Seattle are getting more than puddles in their basements. The roads are a nightmare too, many of them have very deep puddles and we saw some sewer drains that were spewing water instead of accepting it. I hope everyone is staying dry out there.

Anyone know of a good french drain/gutterperson in Seattle?

Thinking about space and workshops

When we moved to our current house I thought the basement was huge and would be a great place to work. 4 years later and feels crowded and out of control. For the past 6 months I’ve been thinking about different solutions to that problem.

My initial thoughts were to build a second building in our backyard. My original design was a garage because this seemed like it would make the most sense for house resale and I liked the roof top deck:

Christine was understandably upset about me taking over one third of the yard. The project would also be very expensive, and I wasn’t sure that a garage was necessarily the best shape.

Version 2 of this plan was still an outbuilding, but one with a smaller footprint and higher ceilings. The tall ceilings would give me plenty of storage (hanging bicycles from the ceiling) and the footprint would be large enough for me needs. It wouldn’t be huge, but it would be okay. That plan looked like this (in cut-away fashion):

Last weekend I made the bad (for me) discovery that the maximum building size without a permit was 120sqft, not 150sqft. 120sqft is really too small to be a good workshop. I’ve also been trying to simplify, and I needed to consider that building a new structure wasn’t really simplifying. This week I’ve been drawing my current basement in Visio to see if I can come up with a better layout.

I started by drawing only the bike part of the basement, but I realized that I needed to consider the whole basement to really make sense of what I have. Here is what I have now:

My real problem with the current basement isn’t the lack of square feet (it is around 450-500sqft), it is with the layout. I have it split into four major areas, two workshops (bicycles and woodworking), laundry, and storage. Both of the workshop areas are too small for the individual goals and they can’t easily be combined due to the layout of the basement. You can see that the bike area is tiny, I can hardly turn around if I have a bike setup on a stand. The bike area needs to be close to the back door for ventilation.

Last night I rotated the storage room by 90 degrees and came up with a much more workable plan:

The key thing here was combining my workshops into a single space. That space is 15ft x 17ft,plenty big for any of my projects. There are two posts in the way,but I can’t do too much about that. The storage room is slightly smaller but has about the same amount of shelf space. My stuff won’t clutter up the laundry area. Bike storage was moved out of the workshop area, reducing clutter there.

I’m excited about this plan. It’s not expensive (especially when compared to building a new structure) and should make the space much more useful. I’ll probably put some of my brazing projects on hold this winter to build out the space this way.

I made a Visiostencil with hanging bicycles and bicycles sitting on the floor for those who want to figure out their workshop space.

Hacking Amplifiers

Side note: A number of friends have commented that my blogging completely stopped a couple of months ago. I’ve been busy with a new role at work and haven’t had as much online time recently. I have a lot to blog about, but less time to do it in. Expect a few entries rapid fire style over the next few days.

I’ve been wanting to make it easier to use the speakers in our kitchen and outside and at the same time reduce our power consumption for doing so. I had been using a single amplifier for either set of speakers and manually switching between speakers depending on which pair I wanted to use. Turning them on involved using the “second room” mode of our receiver even though I always had it playing the same sound as what was going on in the living room. This made it more complicated than necessary.

Getting away from manually switching speaker wires meant getting another amplifier. I had another use for this one, so getting a single amplifier that could handle 4 channels (stereo in the kitchen, stereo in the backyard) was the best solution. Commercial 4+ channel amplifiers are expensive, even when purchased used. However I did find a small kit made by a company called 41hz which promissed to drive 4 channels at about 50W each (way more than enough for background music speakers). The kit uses a Tripath chip, and I know from prior experience with the Teac A700LP amplifier that they sound very good and are efficient (so they use less power and run cooler). The kit also had a small number of parts which seemed good considering how long it had been since I soldered anything. At about $75 shipped for the kit, plus a transformer, case, and some connectors it was much cheaper than buying a commercial amplifier. So I ordered the kit and it showed up at my door a few days later. I also ordered a temperature controlled soldering iron, a cheap case, a transformer, and all of the connectors that I thought I’d need. At this point the total cost was at about $200… a little scary since I didn’t have anything that worked,but still cheaper than commercial amplifiers.

I spent a quite Saturday building it. It went together quite quickly,the most painful parts were surface mount soldering 16 diodes and winding 8 toroids by hand. By the end of the day I had this:

AMP9 board

Iwas happily surprised when it worked brilliantlythe first time that Ipowered it up.I used an old power supply from a long dead set of computer speakersfor testing because my transformer had not yet arrived. It sounded great with my simple basement test.

About a week later the transformer showed up and I got the whole thing installed into it’s case. I forgot to account for connector sizes and the size of the transformer when laying out the case and it turned into a very tight fit, but it did all fit. I also changed from using banana plugs for speaker connectors to Neutrik Speakon jacks, leaving me with some extra “ventilation” holes in the case. Overall I could have done a much better job of laying out the components in the case. The next one will look prettier and luckily no one sees this one because it lives in the basement.

Here is what it all looked like when assembled and connected to a single set of speakers:

and on the inside:

As you can see the toriodal transformer takes up the vast majority of the space. The board is hidden under the wires on the foreground. The heatsink was salvaged from an old Pentium MMX processor. That case is 10″ wide, 6″ deep, and 4″ high so the whole thing is pretty compact. Since it is living in the basement I put the switches, connectors, and volumepotentiometerson the same side, making it easier to setup and adjust.

When finally assembled I measured the power consumption at 7 watts when there is no input signal. That is a massive change from 80W on the old amplifier that I was using. That’ll save us about $5/mo in power bills.

While building all of this stuff I remembered reading that the $100 3-channel Teac A700LP amplifier that we use for the bathroom speakers is actually a 4 channel amplifier with only 3 channels connected. I decided to explore the insides and found that there are two 2-channel circuit boards for amplifiers and a mainboard that connects them to the chassis and input/output connectors. The mainboard was very well labelled and this made it easy add the 4th channel. I just needed to add an output and wire it all up. I didn’t even need an input because I wanted to use 2 inputs on this amplifier for 4 channels (two L outputs and 2 R outputs). I just tapped off of the existing L channel input. A couple of cheap parts and a 30 minutes with a soldering iron and I had this:

I just made a couple of modifications to the case to expose the new potentiometer for the 4th channel and the speaker outputs for the 4th channel. This time I was much more careful with my drilling and the end results look pretty good:

The power supplyin the Teac A700LP is a little underbuiltand wouldbe taxed if I ran all fourchannels at full power.For backgroundmusic use this isn’t much of a concern, it is rarely going to be used at anything other than low loads.

So there we have it.A few evenings of soldering and hacking and I got 2 4-channel 50W amplifiers for just over $300 total (including the $100 that I paid last year for the A700LP). They power the speakers in our bathroom, kitchen, upstairs deck, and backyard. The soldering projects were fun enough that I’m now considering making a small amplifier for work built around the 41hz AMP6 kit.

What to do with all that crap…

I have lots of bags. Too many bags.

I noticed a few months ago that there is a lot of open airspace above the basement stairwell. I realized that I could stick my not very often used bags up here. The problem is that my arms aren’t ten feet long, so I couldn’t reach any hooks mounted up by the ceiling.

This weekend I made it work, despite my human length limbs. A couple of pulleys and cleats from the hardware store, a little scrap lumber and rope, and it all went together.The (teenage, probably daughter of the store owner) clerk at the hardware store said: “I love rope cleats. I wish I had a use for cleats. They are so perfect”. I agree, pulleys and cleats rule.

At the end of each pulley is a hook with a few links of chain. The chain goes around the hang loops or handles on the on bags and backto the hook. Once connected the bags are pulled back up to the ceiling. I fit a few backpacks, three saddle bags, a handlebar bag, my camping hammock, and more panniers then one person really should own (4 or 5 pairs) up there.

More photos:

I hope someone else finds this to be a useful idea. I learned a couple of things:

  • The pulley will tell you what size rope to use. Using thinner rope means it’ll jam.
  • My Little Giantclone ladder works great in stairwells.
  • The little caribiner keychains sold at hardware store checkouts that say “Not for climbing use” work great as the hooks on the ends of the ropes.
  • I need to find my knot tying handbook.

alex

The kitchen is done

I consolidated many photos to a gallery on smugmug:

http://alexandchristine.smugmug.com/House/219581

Christine sat down yesterday afternoon and anotated many of them.

I’m glad to be done with the work, and at the same time I’m already planning our next few projects. I want to do a minor remodel (mostly painting) of the downstairs bathroom, would like to rebuild the upstairs deck, paint the guest rooms, and we’re already thinking about our next huge project, re-landscaping the back yard.

alex

Kitchen update after two weeks

It’s been two full weeks since the contractors first started on our kitchen. They’ve made a lot of progress:

I’ve been taking photos as every major part is done. Each of the links above links to the photos for that portion.

On Wednesday we stopped construction due to a problem with the cabinets. The cabinet boxes that arrived are made of particle board instead of the plywood that we ordered. It is going to take the cabinet company about two weeks to make the new cabinet boxes. Luckily the doors, drawers and hardwareare identical, so they can be moved from our old boxes to the new ones. In the meantime we’ll have a lot of time to repaint the kitchen.

alex

Kitchen remodel starts

I’ve had a super busy weekend taking the old kitchen apart. Our contractors are showing up tomorrow to start on a new one.

Why are we remodelling our kitchen? A lot of our friends ask us this because the old kitchen looked quite nice. Here is a photo:

The old kitchen looked great, but had a lot of shortcomings. The biggest one is that most of the useful storage is up high and hard to reach (even for me at 5′11″, even harder for Christine at 5′1″). There is a dead chimney running up one corner of it which wastes a lot of space and by removing it we can fit a large cabinet for the microwave and dishes. The cabinets in our kitchen were built by the previous homeowner and were well made, but not always well thought out. The silverware drawers were only about 2.5″ high and we couldn’t fit a full stack of forks. The tops of the cabinets were all at different heights which looked kind of strange. The area for the refrigerator was smaller than normal and limited our choices.

Here is what our kitchen looks like right now:

Removing the cabinets wasn’t too bad. I was happy to find someone (a member of my homebrew club) who was interested in all of the cabinets and he helped me remove them. I’m glad to see that they didn’t end up in a landfill.

I spent the rest of yesterday and most of today redoing the kitchen electrical. The original electrical had some serious code violations (the worst was a 50A 240V circuit breaker being split and feeding the outlets and lights over 15A wires). I used the 50A breaker to run a new subpanel and moved all of the kitchen related electrical to the subpanel. It is much cleaner and will allow the contractors to turn off the subpanel for wiring in new circuits without having to turn off the rest of the house power. This is a photo of the subpanel:

There are tons of other photos athttp://blogs.phred.org/photos/house/category1023.aspx. The kitchen will probably be the biggest thing going on in my life over the next month, so I’m sure that I’ll have more blog entries about it and will be updating the photos page too.

alex