Archive for the ‘Bicycles’ Category.

More on bicycle lanes

Portland had a bicycle accident on Thursday that resulted from a right turning cement truck hitting a cyclist who was going straight in the bicycle lane. This has prompted a response from many of my favorite blogs.

Beth Hamon wrote a great piece questioning the use of bicycle lanes on very busy arterials. This resonated with me:

Striping West Burnside — one of Portland’s busiest streets — with a bike lane is a bad idea. Allowing bicyclists to occupy a driver’s blind spot (alongside the car) means they run the risk of getting hit if the driver doesn’t see them. This is not a question of fault. This is a question of poor planning that can and should be fixed. Lose the bike lane, post a lower speed limit and instruct bicyclists to *take the lane* in front of or behind the motor vehicle so that they can be seen. If this doesn’t work — either because cars and bikes won’t play nice there, or because West Burnside eventually becomes the higher-speed backdoor to Beaverton known as Cornell Road, then reconsider the function of such higher-volume, higher-speed roads. Bikes belong some places better than cars do. Cars belong some places better than bikes do. This isn’t rocket science. It’s planning, and until there are no more cars in the world that planning has to work both ways.

Portland is in a unique position (for a medium/large city in the US) of having bicycle lanes everywhere. Perhaps they have too many? Does it do a disservice to cyclists to try and isolate them from all car traffic? I’d argue that it does — cyclists need to understand how to safely get through intersections. Bike lanes don’t help here.

Kent Peterson followed up with an entry coining the term suicide slot:

If you look at Michael Bluejay’s spot (and I really hope I’ve convinced you to take the time to look at it), you’ll see that several of those ten common crashes involve the cyclist being where the driver isn’t looking and/or being in the driver’s blind spot. I call this the “suicide slot”, being to the right of a right turning car.

Now you may say “suicide slot” is a loaded term, that I’m blaming the victim, that the driver should see the cyclist. Well, we can talk about what drivers should do, but as near as I can tell not everybody does what they “should” do. So even even they “should” look to the right,I’m thinking some won’t. And if I’m off to their right anyway,well that strikes me as suicidal. But maybe it is a loaded term. Loaded like a gun. And like a gun, it can kill you.

A couple of months ago John Speare posted a photo of a great sign in Redmond that tries to warn about the Suicide Slot:

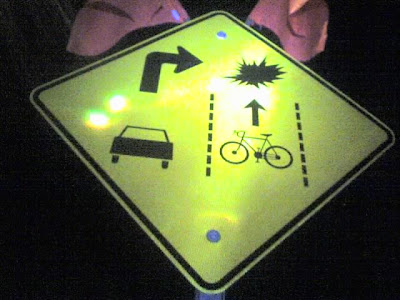
I like this sign. It is better to have the lanes properly stripped (or not there at all), but this gets across the message in a easy to understand graphic. I don’t think that having this sign everywhere would help, but having it at a few key intersections will pass along some education in an easy to digest form. I’d like to see this sign at Eastlake and Furhman.

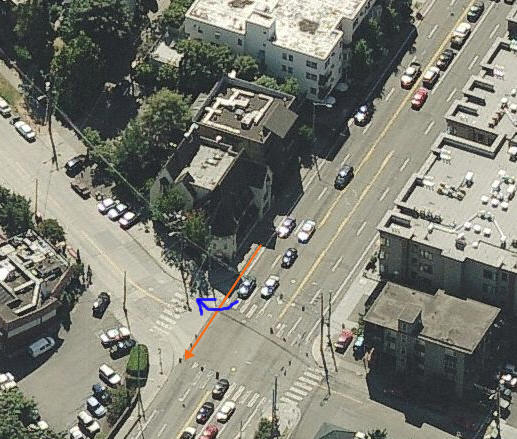
At work we have an internal mailing list that cyclists communicate on. Yesterday someone posted a slide deck from New York City showing their new bike lane plan. It puts parked cars as a buffer between the bike lane and car traffic. This is a common practice in some parts of Europe too.

I don’t like this design. It assumes that there are no intersections.

My first observation when I see this graphic is that the bike lane just before 18th is lining up to put bicycles in the suicide slot to the left of left turning cars. My second observation is that bicycles are completely trapped if they want to turn right onto 19th.

The deck says that NYC solves this problem with bicycle only signals. That is a solution that doesn’t scale. When you start having roads with this design intersect other roads with the same design you end up with twice as many signals. For every car signal (straight, turn only in each direction) you end up with a bicycle signal.

It isn’t practical to isolate bicycles from cars in most situations. Bicycle Paths (like Seattle’s Burke Gilman Trail) work because they are generally located on rights of way that already had few intersections and where most of the remaining intersections are at different grades (the bike path passes above or below the road). That isn’t something that can be built along every road.

Drivers and cyclists need basic education on how to ride safely on the same roads. Bike lanes need to be striped to avoid the suicide slot. Speed limits need to be enforced so that 30mph arterials don’t turn into 50mph highways.

Ride safely out there.

Rack Building Basics — Tubing Selection

Basics

Selecting tubing for a rack is an important first step in building a rack. The number of options is fairly limited based on weight and the accepted standards to work with things like pannier hooks. Selecting tubing sizes will also help you decide which bender to buy.

The three basic outside diameters to choose from are: 3/8″ (about 10mm), 5/16″ (about 8mm), and 1/4″ (about 6mm). There are two wall thicknesses that I’ve worked with: 0.028″ (about 0.7mm) and 0.035″ (about 0.9mm).

I made this spreadsheet to help figure it all out. For these three sizes of tubing and two wall thicknesses it provides the weight of a foot of tubing and the deflection when there is 10 pound load on a cantilevered beam. That second measurement isn’t specifically useful by itself, but it gives an idea of the stiffness of the tubing. I hope that I got the deflection math correct, I didn’t do a test to verify it.

Name Outside Diameter (inches) Wall Thickness (inches) Inside Diameter (inches) Weight of one foot tube (oz) Deflection of one foot tube (inches)
3/8 x 0.035 0.375 0.035 0.305 2.0357 0.3552
3/8 x 0.028 0.375 0.028 0.319 1.6621 0.4194
5/16 x 0.035 0.3125 0.035 0.2425 1.6615 0.6500
5/16 x 0.028 0.3125 0.028 0.2565 1.3627 0.7586
1/4 x 0.035 0.25 0.035 0.18 1.2873 1.3831
1/4 x 0.028 0.25 0.028 0.194 1.0633 1.5868

There are some interesting properties to note:

  • The 0.035″ wall thickness tube of one size is close to the weight of the 0.028″ wall thickness tube of the next size up.
  • Outside diameter has a bigger influence on stiffness than the wall thickness, but both matter.
  • 1/4″ OD tubing slips nicely into 5/16 x 0.35 tubing, and 5/16″ OD tubing slips nicely into 3/8 x 0.028 tubing. This is very handy to know when you are splicing two sections of tubing together.
  • The heaviest tubing is over 4x stiffer than the lightest tubing, but less than twice as heavy.

Handlebar Bag Rack

A handlebar bag rack is designed to support the bottom of a handlebar bag. It is smaller than the bottom of the bag. The bag isn’t tightly connected to it in most cases, so the rack doesn’t need to be designed for high lateral loads. They connect to the fork blades at the mid-point or higher, so there aren’t long unsupported beams. As a result of these design parameters they can be made with fairly lightweight tubing. So 1/4″ x 0.028″ tubing everywhere is probably enough. Some of the classic French racks are made with even smaller tubing (4mm outside diameter).

A standard sized handlebar bag rack has a platform of about 4×7″ or 5×7″. There is one cross member at the middle of the platform and two stays going to the fork blades. For a 5×7″ platform with 8″ stays this gives us a total of (5*2)+(7*2)+5+(8*2)=45 linear inches of material. There will be a little more for the backstop and fork crown mount.

Using 1/4″ tubing we can build the basic rack (no backstop, no fork crown mount) in 4oz of tubing. Using 3/8 x 0.035″ tubing the rack would weigh 7.5oz, a pretty large weight gain since we don’t need the stiffness. Going with 5/16″ only adds an ounce,so that isn’t too big of a deal (especially if you don’t have 1/4″ tubing or bender).

Porteur Rack

A porteur rack is a much larger platform rack that is designed to have the load strapped directly to the rack. The rack is expected to work with loads of 50lbs or even more. The stays on the rack usually connect directly to the fork dropouts,so there is a longer unsupported span (from the fork dropout to the front of the rack).

On these racks lateral stiffness is important. We can get some lateral stiffness from smart design (good triangulation), but we also need to get some of it from the metal. The stays are over a foot long, and we wouldn’t want the rack to shift by an inch or more with a moderate side load (as you’d find when going around corners).

Porteur racks also have a lot more metal. I’ve been building them with 4′ rack circumference (this is a roughly 14″ by 10″ platform), 4 cross members (10″ each), and two staysper side (around 15″ each). That is about 148″ linear inches of metal. One made with 3/8 x 0.035″ tubing would have about 25oz (still under 2lbs) of steel.

You can optimize the weight be mixing and matching tubing. The circumference can be made with 3/8 x 0.028″ tubing and still handle most loads. 3/8″ x 0.035″ tubing makes sense on the stays to minimize side deflections. The cross members can probably be made with 5/16 x 0.028″ since they aren’t that long and each cross member doesn’t carry a lot of weight. By mixing and matching we can get the weight down to 21oz (4oz savings)without compromising the integrity of the rack.

Recommendations

  • 1/4″ or 5/16″ for handlebar bag racks (5/16″ if you plan to zip tie a basket to the rack or carry heavier loads)
  • 3/8″ for heavy duty porteur racks
  • 5/16″ for cross members on porteur racks or lighter duty porteur racks

If I were starting out I think I’d get a 5/16″ tubing bender. 5/16″ is a good balance of being big enough to make moderate duty porteur racks and cargo racks (Bruce Gordon racks are 5/16″) and 5/16″ x 0.028″ is light enough to make a decent handlebar bag rack. The benders are cheaper too, a Ridgid 405 5/16″ bender is about $60, while the Ridgid 506 3/8″ and Swagelok 3/8″ benders are about $200ea (Ridgid also makes a cheaper 406 3/8″ bender, but I don’t know how well it performs with cromoly steel).

You can go too flexible. Rory and I built a handlebar bag rack for his bike out of 1/4 x 0.028″ tubing. The stays connect to the fork dropouts and the bag connects just to the rack. It works, but he says that it is pretty flexible with heavy loads. I think that we’d both use 5/16″ tubing if we were building it again. We’re going to build a couple of small porteur racks with 5/16″, and I’ll report back on how that works once they are done.

Tubing Sources

It’s hard to find tubing in these dimensions in the US. I know of two reliable sources, Aircraft Spruce and Dillsburg Metal. Aircraft Spruce has much easier ordering (you can order online), but Dillsburg is a bit cheaper, especially if you need high quantities.

I’m going to be away for about a week, so it’ll be a little while before the next entry. Leave comments or email me if you have any requests. I know this one didn’t have the interesting photos, next week we’ll be back to photo oriented entries.

Rack Building Basics — Vice grips and spokes

I find the combo of vice grips (or other clamps) and spokes to be really useful for holding small brazeons in place. Today I installed mid-fork eyelets onto a fork, small guides for headlight cable routing, and a headlight mount.

Another favorite tool is the flat stainless stock that is used to secure Blackburn-style racks to bikes. This stuff is really handy for making temporary fixtures.

I used a fender stay here instead of an old spoke, but a spoke really is superior. Brass won’t stick to it and it bends more easily. These guides are cut for 1/4″ tubing, but you can also pull the rollers out of used chain.

Watch out for the vice grips, they can distort tubing pretty easily. Used with care they are very handy for temporary clamps.

Rack Building Basics — Making cross members

Most racks have some sort of cross member, straight tubing that goes across the rack platform. They are pretty easy to build.

One of the tricks is getting the two miters to be parallel to each other. I find it simplest to put some scrap metal in the miters and then eyeball them for parallel. You want to check early and often because you do want to be parallel when you have the tube the correct length. In this case you can see that I’m a little off:

It is important to clean the inside and outside of the metal before brazing.To clean the inside of the tubing I make a simple bit for the drill. This is a piece of 1/4″(or smaller)tubing with a slot cut in it to hold a small piece of shop cloth. Scraps of shop cloth are always somewhere on the workbench.

Support the tube in a vise and put the bit inside of it. The sand paper will remove any deposits on the metal and make for better joint.

Once you have the cross members cut, mitered, and cleanedyou need to lay them out. I find that it is best to number which position each one is in and draw alignment marks on the cross members and the rack. I measure to get even spacing across the rack, but use my eye to determine when they are parallel to each other and the sides of the rack. The rack platform may not be a true rectangle and it’s more important that everything look good than that everything is perfectly measured and square.

The rack is parallel to the ground and held in the vise after the last step. With everything laid out I tack each of the joints with a small blob of brass. I don’t use any clamps or fixtures for this, the cross members stay in place on their own. This isn’t the only possible option — Alistair likes to position the rack vertically and use clamps to prevent the stays from sliding down. Once everything is tacked I rotate the rack in the vise and make sure that the valley of each miter is pointing down. This lets me use gravity to flow the brass where I want it to go and to get the best fillet.

Once you’ve brazed everything on one side you flip the rack and do the other side.

Rack Building Basics — Fork Crown Mount

In this entry I’ll show how I build the fork crown mount for a rack. This is the part that goes from theback of the rackthrough the fork crown.

On a rack that is designed for very heavy loads I would recommend connecting the rackto the fork crown using two stays, one over each fork blade. This single stay setup is not as good at resisting high lateral loads. It does work with almost everyfork though, where thetwo stay method only works with forks that have extra eyelets on thetops of the fork blades.

I don’t have a lathe, so I use a bolt as the threaded stud that runs through the fork crown. This is a M6 bolt that I’m removing the head from:

The bolt will be held inside some larger diameter tubing. First I need to cut the tubing square. Note that to make sure that it is square I need to check the cut in two orientations 90 degrees from each other.

This is an exploded view of what is going on. I have a 6mm (close to 1/4″) threaded stud that will be inserted into some 5/16 x 0.035″ tubing. This is then inserted into some 3/8 x 0.035″ tubing. The 3/8″ tubing is bent and will be brazed into the fork crown. The 5/16″ tubing is pulled out from the 3/8″ tubing in this view, but when brazed together the 3/8″ and 5/16″ tubing will be flush. This creates a nice face to sit against the fork’s crown.

Everything is loaded up with flux and ready for brazing:

A view after the three parts are brazed together.

Here is a shot showing how I hold the piece in place while brazing it to the back of the rack. I’m using vice grips on the rack and a piece of scrap metal (PCI slot cover from a PC) to hold the piece in place. I checked with a square to make sure that the threaded stud is square with the back of the rack.

Here I am checking the angle. The bike that this is going on has a 73 degree head tube angle, so the face of the fork crown is also 73 degrees. I want it to sit flat (or close to it), so I need to angle my mount at 17 degrees (73 + 17 = 90). I’m using a simple engineers protractor to check the angle. My reference is one of the stays on the rack. I’m a little shallow here, but that is okay. It will make the front of the rack slightly higher than the rear, and that is acceptable.

The other option for doing this is to mount the fork crown mount into a fork and then use a fixture to hold the rack in place. The advantage of this method is that you can see how everything will look before it is brazed together. Alistair designed this nice little jig out of a test tube holder for holding the rack in place while brazing. I like the jig, but find that things are a little more secure using my method. Give both a try and see what works best.

The fork crown mount is half brazed onto the rack. I flipped the rack over to finish the brazing on this side.

All done

A Saturday morning folding bike breakfast

Kent, Mark and I met at the top of the I90 bridge this morning for some socializing and bike geeking. The toys of the day were my Bike Friday Tikit and Kent’s Dahon Curve. Mark brought along Jan Heine’s Alex Singer — normally one of the most interesting bikes of the bunch, but today it didn’t get much attention.

Kent’s Dahon is really nice. For $400 you get a bike which folds up to a tiny package (not as small as a Brompton, but smaller than the Tikit) and which rides nicely. Contrasting the Dahon and Tikit was fun. The Dahon is very simple in comparison. The fold isn’t as slick, but it is fast enough (Kent says it takes about a minute). The Dahon folds into a small package partially because it is a small bike to begin with — both Mark and I felt that it was undersized than us. Kent said that if you think about it as the fast alternative to walking then you’ll have the right mindset. I was impressed with the parts spec on the Dahon. For $400 it includes some nice features like Schwable Big Apple tires and a simple and effective Sturmey 3sp drivetrain.

Kent and Mark were impressed with the fast folding of the Tikit and Mark liked the riding position (which is pretty similar to my other bikes). The Tikit has some handlebar flex that I’m still working out, but once you get used to it the ride is pretty nice. The Tikit is closer to a normal bicycle in ride and fit, but it also has a much more complicated design and is much more expensive.

The ride also gave me a chance to try out my newest rack. I built a second rack for the Tikit that fits into the folded bike more nicely than my original design. There is clearance for the saddle to fit into the rack and it doesn’t get in the way of the rear tire when the bike is folded. I think that I came up with a solution that is asthetically pleasing and functional.

bike lanes kill

On September 7th a cyclist named Bryce Lewis was killed in Seattle at the intersection of Eastlake and Furhman (heading north on Eastlake just before the University Bridge). The cyclist was going straight and a dump truck turned right across his path, dragging the cyclist for 25 feet.

Here is what the intersection looks like (thanks to the aerial photography of local.live.com):

The cyclist’s path is the orange line, the dump truck’s path is the blue line.

The city is not holding the dump truck driver responsible. Most cyclists are upset and think that the driver wasn’t looking and thus isclearly at fault. I personally hold the city responsible — the bike lanes should never have been stripped this way.

Almost all bike lanes (including the ones above) put cyclists at the right side of the road all the way up to the intersection. This puts the cyclist to the right of right turning cars. When I’m riding I avoid this by pulling into the lane before the intersection, but that is not an obvious or typical thing for a cyclist to do. The bike lane needs to merge with the traffic lane before the intersection, cross the traffic lane, or otherwise indicate that bicycles going straight should not be on the right side of cars which are turning right. I don’t want to see more bike lanes in Seattle if they are designed like the ones on Eastlake Ave.

—————-

I was also disappointed to see that The Stranger (one of Seattle’s weekly’s) put Cascade Bicycle Club on the genius shortlist. They specifically gave credit to David Hiller for the Stone Way Bike Protests, an event which was actually planned and organized by a point83 spinoff called “Seattle Likes Bikes“. Cascade often does good stuff, but there is a lot more going on than what they organize. The point83 guys got together last weekend and built a memorial at the accident location. I’ve ridden past the accident location two or three times since then and there are always people looking at it. This does build awareness.

As an aside, I was hit by a car on April 17th about 300′ from the accident shown above. I’m okay. I was also in the bike lane when a southbound car turned left across my path. Someday I’ll write a full blog entry about my learnings on dealing with insurance after a bicycle accident.

Tikit followup

This is a followup to my previous mini-report on the Bike Friday Tikit. I took it on a 10 day trip to Philadelphia, Brooklyn, and Saugerties, NY. This involved two flights and a lot of car travel. I used the bike for 3 twenty mile rides, mostly in the Saugerties/Woodstock area. The rides were really enjoyable and gave me time to explore some of the backroads that we don’t see while driving around the area. Once back in Philadelphia my brother and I went for a nice around Springfield Township. This is all riding that I wouldn’t have done without a bike along, but none of it would really be enough to justify bringing a full size bicycle.

The Tikit packs almost as fast as Bike Friday says. It takes me a little bit longer due to the drop bars and my front rack (which has two bolts), but it packs much more quickly than my New World Tourist did. Everything that I need to remove is easy to adjust, unlike the NWT where I removed the cranks, derailleurs, and other major components. I’d guess that I’m packing the bike in about 15 minutes, and unpacking it in about 10. There is a lot (almost too much) of extra space in the suitcase and I had no problems storing my rack, shoes,water bottle,and tools in there with the bike.

The fold is really fast. On Wednesday I used the Tikit to bike commute (which involves a bus). I arrived at Montlake bus stop and started folding the bus. I looked up and a bus was arriving, but I still had time to put the cover on the bike. My Tikit folds wider than stock (due to the drop bars), but it still makes a fairly compact package that was easy to carry aboard.

I’m happy with the gearing that I have on there (54t chainring, 11-34 cassette, which gives me 25 to 80 gear inches). In Saugerties I rode up some very steep unpaved roads and they were challenging but no more so than on my other bikes. The bike handled nicely when coming back down them too.

I emailed the service department about the little bit of play that I had in the hinge that holds the stem. 15 minutes later I had a phone calll from the owner of Bike Friday (Hanz). He gave me some suggestions and I’ve been able to eliminate most of the play. I’m very happy with the companies service.

All in all I’m very impressed. I’d still suggest the Bike Friday New World Tourist for someone who wants to fly to a destination and spend a week on the bike. If you are primarily using the bike for shorter trips and mixing in a lot of other forms of transit (bus, car, train) I’d suggest the Tikit. It rides almost as nicely and folds much more quickly. I don’t think I’d have any problem doing some light touring (overnighters) on the Tikit.

What would I change now that I have a bit more experience with it? I still think that the bike would be better with an internal gear hub. I’ll be putting one on after I learn more about the SRAM i9. I want to tweak the design of my front rack a little bit and wish that Bike Friday had a better system of their own for carrying cargo. A second water bottle cage might be nice. It could be a little cheaper orcome with nicer components. All of these are minor complaints — it really is a very nice folder. It’s a nice blend of folding fast, folding pretty compactly, fitting into a airline-legal suitcase, and riding pretty well. There are many folding designs that can do some of these things, but not many that do them all.

Peter White’s interesting observation on saddle comfort vs shifters

He posted this to the touring list, but I think it is something that is interesting to a wider audience:

http://search.bikelist.org/getmsg.asp?Filename=touring.10708.0740.eml

I’ve noticed a dramatic increase
in saddle complaints from cyclists since the early 1990s, when STI and
Ergo shifters became the norm on better quality bikes. With shifters in
the brake levers, it’s much easier to shift gears than with other
shifters. So cyclists tend to shift gears more often now than they used
to, with detrimental effects on the old tush. Here’s why.

I haven’t put significant time on STI or Ergo shifters in about 10 years (my bikes have downtube or barend shifters). I do tend to stand on small short inclines. On Sunday I rode with my friend Rory who does ride with Ergo and I don’t think he shifted much more often than I did or spent more time seated.

Someone’s probably looked at the photo above and is wondering why that bike has STI and barend shifters. It was an overly complex setup:

  • STI left shifted a SRAM 3×7 hub
  • STI right shifted the rear derailleur
  • Barend left shifted a front derailleur
  • Barend right controlled a drum brake

If I still owned this bike I’d have ditched the 3×7 hub and STI shifters.

Bike Friday Tikit mini-report

My Bike Friday Tikit arrived last week. I found it at my house around 5:15pm and had it unpacked and ready to ride by 5:30. The bike unpacks really fast and I enjoyed my first ride on it (with a few component exceptions).

Over the weekend I converted it to drop bars and made a front porteur rack for it. I made the following changes:

  • Changed from flat bars to drop bars
  • Installed adapters to make the V-brakes work with drop bar levers. I’ll probably change the levers to Diacompe 287-V sometime in the future…I really don’t like V-brake adapters.
  • Swapped the 175mm crank arms for 170mm ones.
  • Changed the cassette from an 11-28 to an 11-34. This also required swapping the rear derailleur to handle the larger cogs. When the SRAM i9 hub is available I expect to switch to that.
  • Installed my favorite saddle and pedals.

The front rack was a little tricky to make. I wanted to make it pack easily and didn’t want it to interfere with the fold.I originally made the rack platform a little large and had to remove about 1cm from the left to clear the front tire. When the bike is folded the saddle rests inside the rack. I don’t think that this will be my final design, I want to experiment with a triangular rack platform to reduce the size and eliminate any chances of saddle interference. This design does work for now and my first couple of trips.

I took the bike for a test ride today and it rides pretty well.There is a little bit of play in the stem hinge, but I expect that I can adjust that out. The rest of the frame seems to be very stout.

The fold on this bike is amazing. With a little practice (it took me about 5 tries to get the hang out of it) it folds down in a few seconds. My first attempt was not pretty and took significantly longer (but Josh and Cam probably got a laugh out of it). Once folded everything is secured nicely by a single latch and there are no traditional quick releases. My front rack and the drop bars make it a little wider than a stock Tikit, but it is still reasonably small. The fold protects the drivetrain (and keeps the greasy chain away packed away in the middle). More importantly it doesn’t put the handlebars in the middle which makes converting to drop bars possible. This is not true of many folders by Downtube and Dahon.

It packed into the suitcase quickly. This was my first attempt at packing it and I had to figure out a new packing method to work with the drop bars, but it still packed more quickly than my old New World Tourist. I had to loosen six bolts: seatpost, stem riser, pedals, front fender, and handlebar clamp. The stock handlebars don’t even require you to loosen the handlebar clamp. It’s a big change from my New World Tourist where I remove the handlebars, saddle, derailleurs, left crank,and pedals.

I think it’ll be a winner.

If you want more details on the Tikit I recommend reading the review by The Folding Society.

It’s hard to find details on the components on the stock Tikit. I expect that they are still figuring out the best component list. Here is what my bike came with:

  • Flat handlebars with SRAMMRX Gripshift,Tektro V-brake levers, foam grips, and a bell.
  • Microshift rear derailleur. I have no experience with this companies components, but it seems to be okay (it’s better built than the plastic Shimano Sora rear derailleur)
  • Tektro V-brakes. I’ve had some problems with the return spring popping off of the spring tension screw. When I go to the SRAM i9 I expect to use a hub brake in the rear and better V-brakes up front.
  • The wheels have Joytech hubs, un-branded rims, and 24 spokes. The front hub is narrower than a normal hub. The stock cassette is made by SRAM, 8sp, and 11-28.
  • The headset is made by Diacompe and appears to be 1 1/8″ threadless. I haven’t pulled apart the front end to figure out exactly how their steerer and headset arrangement works.
  • The tires are Schwable Marathon. These tires can ride a little rough, but are a pretty good choice for a utility oriented bike.
  • The saddle is a pretty typical plastic/gel saddle. I actually found this to be more comfortable than I expected.
  • The crankset is a generic 130mm BCD crank. The large Tikit comes with 175mm crank arms. The chainring has 53 or 54t and there is a matching chainguard ring. The bottom bracket is a generic cartridge bottom bracket.
  • The seatpost is a Kalloy Uno.
  • Planet Bike Fenders. The rear one has a custom stay that allows the bike to stand on the fender when folded.

When I first saw a Tikit I was a little underwhelmed by the component spec, but upon riding the bike I realized that it really wasn’t too bad. The spent money on some of the most important parts such as tires. I think the first model really should have used an internal gear hub, but the derailleur setup does work pretty well.